Saturday, 21 February 2009

Kick Drum Synthesis

This tutorial presents an approach for synthesizing kick drum sounds using Aspect. Aspect is available for Mac OS X, Windows, and Linux in Audio Unit, VST Plugin, and Standalone formats. Download the Aspect evaluation here. The evaluation version is all that is required for following the tutorial. However, only registered users will be able to open the example patch accompanying this article.

Rather than a general kick drum synthesis guide, this will focus on recreating a specific kick sample. The analysis techniques outlined below can be applied to a wide range of sounds, and provide a solid starting point when attempting to recreate any sound. Here is the kick drum sample, a heavily processed 808, that we will attempt to recreate:


Download the 808 sample here.

Analyzing the source sample will reveal important cues that can help when recreating it as a synth patch. For this, we will use Audacity, a free, open-source, wave editor available for Windows, Mac OS X, and Linux. Audacity can be downloaded from here.

Load the original sample into Audacity. The default view in Audacity is the waveform, a graph of time (running along the x-axis) against amplitude (running up the y-axis).
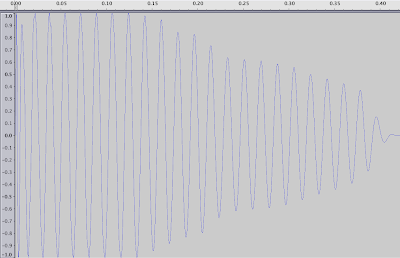
Kick drum waveform
Several key points can be noted here:
  • The kick sample lasts approximately 0.43 seconds.
  • The kick amplitude envelope is more or less stationary until 0.12 seconds, at which point is decays towards 0.
  • The general wave shape is a sine. Zooming in closely to the waveform reveals that it isn't a perfect sine: there appears to be small amount of noise and grit in the signal.
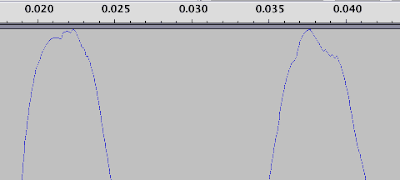
Noise in kick drum waveform
  • The sine is gradually falling in frequency. This can be deduced from the increasing wavelength of the oscillator periods. A clearer view of the frequency content of the sample can be displayed by switching Audacity to its Spectrum display mode.

Click on the "808kick1" combo box at the top left of the Audacity track, and choose Spectrum from the display modes. Because the kick sample is made of low frequency content, changing the Spectrogram options (under Preferences) to 4096 sample FFT Size and Maximum Frequency of 2000Hz limits the display to the most useful content.
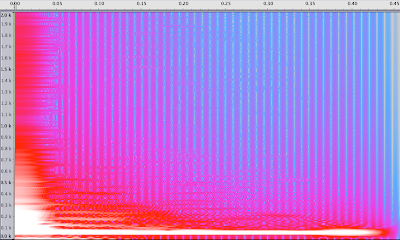
FFT view of kick drum
From this view, we can establish the following:
  • An initial burst of noise between 0.00 and 0.05 seconds.
  • A falling tone between 0.05 and 0.20.
  • A steady state frequency of about 50Hz.


This gives us enough information to begin synthesis. Open Aspect, and create an empty program by choosing File / New Program.

We know the general waveform shape, so change Oscillator 1's Shape to Sine. We don't need the Oscillator to track the keyboard, so remove Note Pitch from Oscillator 1's first modulation slot (by clicking on it and selecting "None" from the menu.) Finally, tune the Oscillator to a suitable frequency: an Octave of -3, Transpose of -7 and Detune of 24cents sounds about right. Playing a note gives a suitably sub-kick like sound.

Aspect settings for kick drum oscillator
Next, we'll shape the amplitude of the kick using Envelope 1. From our analysis, we know that that sample lasts around 430ms. Tweak Envelope 1 to have an approximate Attack of 1ms, Decay of 430ms, Sustain of 0%, and Release of 430ms. Surprisingly, this sounds much shorter that the source sample. Why? This is due to Aspect having particularly punchy envelopes. Decay and Release stages fall much more rapidly in Aspect than in an 808. Increasing the Envelope Decay and Release times to 880ms gives us the expected sound.

The initial noise burst is modeled using Envelope 2 (keeping with its default values of an Attack of 1ms, Decay of 5ms, 0% Sustain and 10ms Release) assigned to Oscillator 1's first modulation slot. A Depth of 39.33 semi-tones lends an appropriate crack to the drum sound. The falling tone is generated using Envelope 3, with an Attack of 1ms, Decay of 55ms, Sustain of 0% and Release of 60ms. This is assigned to Oscillator 1's second modulation slot, and given a Depth of 31.55 semitones.

A little grit is added to the drum by introducing a small amount of Noise (about 13%) into the Mixer. In order to add a small pitch variation, the Noise is also used as a the source for Oscillator 1's third modulation source. A Depth of 16.00 semitones sounds about right. Finally, any unwanted high frequencies components are removed by lowering Filter 1's Cutoff frequency to about 62%.

Altogether, this sounds like:


Download the Aspect 808 patch here.

Whilst it is not exactly identical to our source, it's certainly very close. And in the context of a mix, it'll be even more difficult to tell the synthesized kick from the source sample.
Sunday, 8 February 2009

Probabilistic Step Sequencing meets Cellular Automaton with Elysium

Aleatoricism is defined as "art created by exploiting randomness". From Pierre Boulez's experimentation with controlled chance to Brian Eno's use of Koan to produce Generative Music 1, it's a well explored area of music composition. Even Roland's TB-303 offered prospects for the aleatoric explorer: leaving the battery removed for a short time corrupted the sequencer memory, generating 64 tracks of random acid.

Elysium is a probabilistic sequencer, developed by LucidMac Software and available (for free) on Mac OS X. It's a pure sequencer, not a synthesizer or a host. It doesn't produce any sound itself, but generates a MIDI stream that can be used to drive any MIDI consuming application or hardware. Despite this, syncing with a DAW such as Logic or Live running on the same machine as Elysium is completely pain-free; no additional configuration was required to get it working.

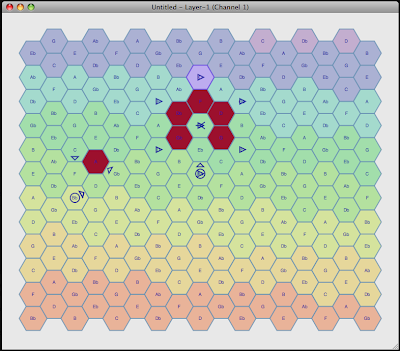
The Elysium interface is made up of a grid of hex cells, each representing a note of a certain pitch. Playheads move across the grid in sync with the tempo. By placing tokens on cells, the playheads (which are spewed out at specified tempo from a Generate token) can be made to perform an action: a Note token causes the note on the underlying grid to be played; a Split token divides a single playhead into several, each launching out at different trajectories; a Rebound token bounces the playhead back in the opposite direction.

Elysium sequencer screenshot

Tokens can also be assigned probabilities, only performing their functions on a roll of the virtual dice: 50% of the time, this playhead will rebound; 25% of the time, this note will play. Using this system, constantly varying pieces of music that would be tricky to compose using traditional sequencers can easily be easily generated.

Watching playheads creep across a grid is somewhat reminiscent of John Conway's cellular automaton Life simulation. The interface is simple to use, but not necessarily intuitive at first glance. Reading the introductory documentation, which is scant but does well in explaining the basics, is advised.

Elysium is currently only available for Mac OS X. It was recently released as open-source under the MIT license, so there is a chance of seeing a port to other operating systems. More information about Elysium can be found at http://lucidmac.com/products/elysium

Monday, 2 February 2009

Unison in the Aspect Synthesizer

The classic unison sound, produced by mixing a large number of detuned sawtooth waveforms, is a defining element of many forms of electronic music. Genres such as trance owe much of their identity to this fat (or indeed, 'phat') sound. Its popularity can be traced to the supersaw waveforms of 1990's hardware synths, the Novation Supernova, or the Roland JP-8000. But its roots extend further back, to 1980's analogue hardware like the Roland Juno 106 or the Sequential Circuits Prophet 5. In the case of the Prophet 5, we have a five voice polyphonic instrument, with each voice having two oscillators. By sacrificing polyphony and turning on unison mode, all ten oscillators could be detuned and dedicated to a single voice.

This tutorial covers the basics of unison mode in Aspect. Aspect is available for Mac OS X, Windows, and Linux in Audio Unit, VST Plugin, and Standalone formats. Download the Aspect evaluation here. The evaluation version is all that is required for following the tutorial. However, only registered users will be able to open the example patches accompanying this article.

Aspect's Unison control is at the bottom right of the Aspect interface, next to the Polyphony control. This is no coincidence: unison is closely related to polyphony. With Unison set to '1 (Off)', Aspect acts a traditional polyphonic instrument. Each note played uses one voice of polyphony. Increasing the value of the Unison control increases the number of voices in a note. For example, setting Unison to '2' means that each note played will result in using two polyphonic voices.

Stacking voices is only useful when each voice is different. Five voices, all producing exactly the same sound, simply sounds like a louder version of one voice. The key to a powerful or interesting unison sound is in the differences between each voice. In Aspect, this variation comes from using the UnisonDepth modulation source to give each voice its own sound.

Supersaw
The first unison sound we will create is perhaps the most recognizable, and certainly the simplest: the supersaw. As you will recall from the introduction, the supersaw is created by stacking a large numbers of detuned sawtooth oscillators.

Start with the default patch (click on File, and then New Program). This gives a very basic starting sound of a single oscillator routed into a fully opened lowpass filter. Whilst not interesting in itself, it's an ideal base upon which to build more complex patches. Set the Unison to 5 voices by clicking on the Unison control and dragging upwards. Likewise, set the Polyphony to 20, and turn the Volume down slightly. The Global section should now look something like this:

Unison settings for synth supersaw in Aspect
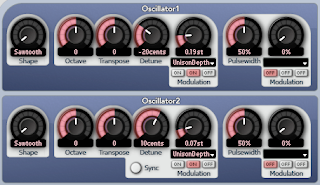
In order to detune each voice, we now need to assign the UnisonDepth modulation to the Oscillator pitch. The first modulation slot has been assigned to Note Pitch, so we'll move onto the second. Click on Oscillator 1's second modulation slot (the white button in the middle that says 'Off', slightly below and to the right of the Detune control). Then click on the combo box above the button, and select 'UnisonDepth' from the modulation source list. Now, whilst playing a note, increase the modulation depth by turning the rotary control. Notice that as the UnisonDepth increases, the detuning becomes more prominent and the sound becomes fatter.

Now let's do the same to Oscillator 2. First of all, ensure that Oscillator 2 is routed into the main mix by turning up the Oscillator 2 control in the Mixer. Feel free to tweak each Oscillator's Octave, Tranpose, and Detune controls until you find a suitably big sound.

Oscillator settings for synth supersaw in Aspect
Choosing a suitably plucky Envelope 1 shape produces the following sound:


Download the Supersaw patch here.


Panning
Whilst the supersaw may be impressively big sounding, we can do better. Panning each voice around the stereo panorama produces a wider, more encompassing sound. The following steps detail how to use UnisonDepth to pan voices:

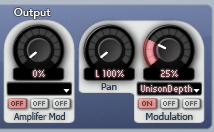
  • Set the Pan control in the Output section all the way to the left.
  • Route the UnisonDepth modulation source to the first Pan modulation slot.
  • Set the first pan modulation depth to 25%. The Pan position is represented as a percentage: 0% meaning panned hard left, 50% in the middle, and 100% panned far right. By setting the pan modulation to 25%, each voice will be placed as follows:
  1. First voice, 0%, left.
  2. Second voice, 25%, halfway between the far left and middle.
  3. Third voice, 50%, middle.
  4. Fourth voice, 75%, halfway between the far right and middle.
  5. Fifth voice, 100, right.

Pan position for unison supersaw in Aspect
Which sounds like this:


Download the Panned Supersaw patch here.


Unison Chords
Detuning each voice by a small amount, such as few cents, gives the impression of one fat sounding note. But rather than detuning oscillators by small amounts, we can also detune by much larger values. Detuning by semitones, for example, can create chords from single notes.

  • Start with a new, empty, program ( File / New Program).
  • Set the Unison to 2 and Polyphony to 12.
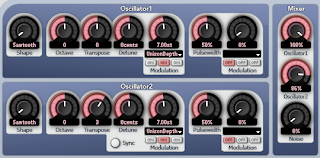
  • Route Oscillator 2 into the mix by increasing the Mixer / Oscillator 2 control.
  • Transpose Oscillator 2 by 3 semitones.
  • With Oscillator 1, select UnisonDepth as the second modulation source and increase the depth to 7.00 semitones. Note that any rotary control can be finely tuned by holding down shift whilst dragging it.
  • With Oscillator 2, select UnisonDepth as the second modulation source and increase the depth to 7.00 semitones.

Synth chord settings
Each note played will now produce a four note chord, which sounds like:


Download the Unison Chords patch here.


Additive Synthesis
Additive Synthesis involves mixing together sine waves of different frequencies to produce complex waveforms. A simple additive instrument to emulate is the drawbar organ - by combining just six sine waves, a convincing Hammond organ sound can be produced.

  • Start with a new, empty, program ( File / New Program).
  • Set Unison to 3, and Polyphony to 12
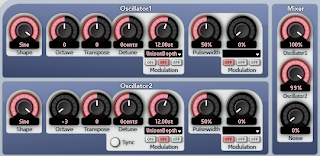
  • Route Oscillator 2 into the mix by increasing the Mixer / Oscillator 2 control to 100%.
  • Set both Oscillator 1 and Oscillator 2's shape to 'Sine'
  • Set Oscillator 1's second modulation slot source to UnisonDepth, and set a depth of 12 semitones.
  • Transpose Oscillator 2 down -3 Octaves, and set its second modulation slot source to UnisonDepth, and set a depth of 12 semitones.

Synth hammond organ oscillator settings
This will produce a sound that is a combined series of six sine waves, each an octave above the last. This sounds like:


Download the Sine Organ patch here.


Filter Mix
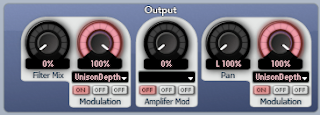
The Filter Mix modulation slots allow each voice within a unison note to have different mixes of Filter 1 and Filter 2. In the following example, a two voice unison note is split so that one voice consists of Oscillator 1 routed through Filter 1 and panned hard left. The second voice consists of Oscillator 2 routed through Filter 2 and panned hard right.

Dual filter settings

In this instance, the first voice is a simple bass note, whilst the second is a simple 2 note arpeggio. Altogether, this sounds like:


Download the Filter Mix patch here.


Formant Filters
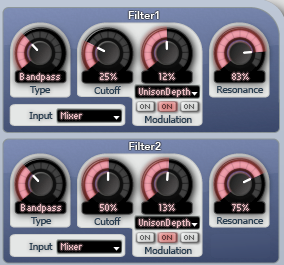
Formants are resonant peaks within the spectrum of a sound. It is the formants caused by the mouth, vocal and nasal tracts that gives speech, particularly vowels, their identifying sound. Vowel formants can be approximated by using four parallel bandpass filters. Whilst Aspect may only have two Filters per voice, by using two unison voices per note we get the required four bandpass filters.

Formant vocal synthesis settings

This has a distinctly vocal flavour to the sound:


Download the Formant Filter patch here.

Conclusion
Aspect's unique architecture and UnisonDepth modulation source offer practically limitless flexibility. Stacking unison voices is a simple way to extend the limitations of two oscillators and two filters per voice. Variations within each voice is the key to producing interesting unison sounds.