Monday 22 June 2009

Modular Synth Patching in Aspect, part 2

We continue from where we left off at the end Part 1; exploring the Patch and Modulation capabilities of the Aspect semi-modular synth. This article will cover the last three components in the Patch section; the Lag Generator, the Adders, and the Sample and Hold unit. Download Aspect for Windows, Mac OS X, and Linux, in Audio Unit, VST, and RTAS Plugins formats.

The Lag Generator Component
The Lag Generator slews the input Modulation Source, reducing the speed of changes. Similar to how Glissando causes note pitches to slide into one another, the Lag Generator can be used to make any Modulation Source slide. As the Lag Parameter increases, more time is taken for the Modulation Source to slide between changes.

Slewed Filter Cutoff
This example uses the Lag Generator to slew a Square waveform LFO which is modulating the Cutoff Frequency of a Lowpass Filter.
  • Set LFO1 to Square shape, and Sync it to a rate of 1/2.
  • Connect LFO1 to the Lag Generator.
  • Change Filter1's Cutoff to about 50% and Resonance to about 30%.
  • Connect the Lag Generator Modulation Source to the Cutoff Modulation, with a Depth of about 90%.
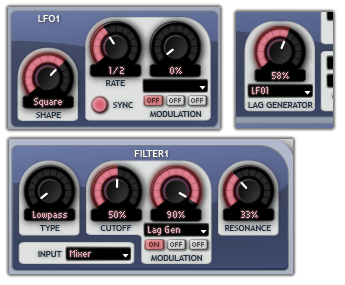
Filter modulated by a slewed Square LFO in AspectHold down a note whilst slowly increasing the Lag Parameter. At low values of Lag, the Modulation Source still resembles a Square waveform. As Lag increases, the Square wave is softened and audible slides between the high and low values of the waveform can be heard. At higher values of Lag, the waveform starts to resemble a Sine, and eventually reaches a constant when the Lag is so much that any changes are too small to be heard.


Download the Slewed Filter Cutoff Patch here.

Emulating a Magnetic Tape Player
This example uses the Lag Generator to filter the White Noise Modulation Source. This creates a signal that slowly moves between random values (this type of movement is called Brownian Motion.) When used to modulate Pitch, this generates a meandering, detuned effect similar to the wow and flutter of an old tape recorder.
  • Connect the Noise Modulation Source to the Lag Generator.
  • Set the Lag to about 70%.
  • Oscillator1 should be a Sine shape, with a Pitch of 1 Octave up.
  • Connect the Lag Generator Modulation Source to Oscillator1's Second Pitch Modulation Source with a Depth of about 40 semitones.
Sines modulated by filtered white noise in Aspect


Download the patch here.

The Adder Components
The Adder components, Adder1 and Adder2, each take two Modulation Sources and produce a signal that is equal to the sum of the inputs. Because Parameters are already able to sum Modulation Sources (due to the fact that they all have three independent Modulation Slots), the Adder components may seem of little use. However, there are occasions when combining Modulation Sources outside of Parameter Modulation Slots is useful:

You may wish to connect several Modulation Sources to a component that only has one input connector (such as the Lag Generator, Sample & Hold, or Inverter components). Use an Adder to combine the Modulation Sources, and then connect this single Modulation Source to the chosen component.

If all of a Parameter's Modulation Slots have been assigned, and you need to add another Modulation Source, you can combine multiple Modulation Sources into a single one with an Adder. This single Modulation Source will allow two Modulation Sources to use up only one Modulation Slot in a Parameter.

The Adder can be used to combine signals to produce custom waveforms. This waveform can be fed directly into either Filter by choosing Adder1 or Adder2 from the Filter's input selector. The following example creates a waveform by subtracting one slightly detuned oscillator from the other:
  • Detune Oscillator2 by -1 cent.
  • Connect Oscillator2 to Inverter1.
  • Link Oscillator1 and Inverter1 into Adder1's inputs.
  • Choose Adder1 as the input to Filter1.
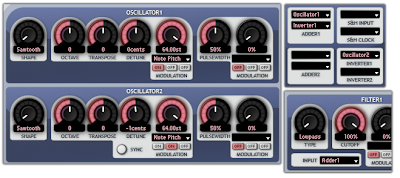
Custom waveform creation in the Aspect semi-modular synthBy summing an out-of-phase Sawtooth Oscillator with an inverted Sawtooth, we get a Pulse waveform. To add a bit of time-varying interest to the sound, an LFO will be used to add movement to one of the raw Oscillator sources:
  • Set LFO1 to Square, and Sync it to a rate of 1/4.
  • Link LFO1 to a one of Oscillator2's spare Pitch Modulation Slots, and give it a Modulation Depth of 12.00 semitones (remember: holding Shift will allow finely grained changes to be made to controls.)


Download the patch here.

The Sample and Hold Component
The purpose of the Sample and Hold (S&H) component is to keep a Modulation Source's value steady for a short time. The component takes two inputs, a Source and Clock; whenever the S&H Clock input source changes from a negative to a positive value (known as a zero-crossing), the current value of the S&H Input source will be taken and held steady until the next zero-crossing.

Here a Noise source is periodically sampled by the Sample and Hold component, with the sampling period controlled by a Sawtooth LFO connected to the Clock input. This creates a Modulation Source that changes to a different random value at the same rate as the LFO. To configure this in Aspect:
  • Connect the Noise Modulation Source to S&H Input.
  • Connect LFO1 to S&H Clock.
  • Set LFO1 to a rate of about 7Hz.
  • Connect S&H to Filter1's first Modulation Slot with a Depth to 100%.
  • Set Filter1's Cutoff to about 30% and Resonance to 100%.
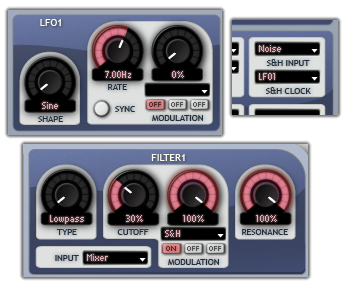
Filter modulated by White Noise through a Sample and Hold unit.This S&H Noise to Filter creates a classic synth sound you've no doubt heard before:


Download the S&H Filter Patch here.

Sample Rate Reduction with the Sample and Hold Component
With Aspect, because there is no difference between Audio and Modulation signals the Sample and Hold component could also be used to sample an audio source at a specified clock rate. This distortion is known as Sample Rate Reduction, and produces a lo-fi, crunchy timbre.
  • Connect Oscillator1 to the S&H Input, and Oscillator2 to the S&H Clock.
  • Select S&H as the Input for Filter1.
  • Tune Oscillator2 up by 2 Octaves, and Tranpose is to 8.
  • Reduce the digital harshness slightly by setting Filter1 Cutoff to 50% and add a little bite by turning the Resonance to 50%.
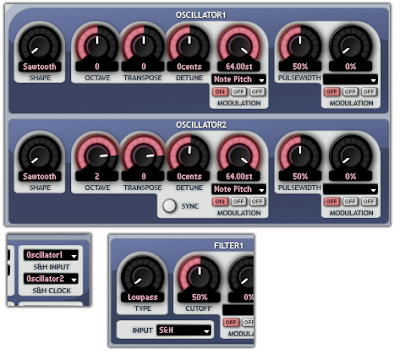
Distortion via low sample rate in AspectThe pitch of Oscillator2, which is used to clock the Sample and Hold component, sets the Sample Rate of Oscillator1. Changing the Pitch of Oscillator2 changes the Sample Rate. At 2 Octaves and 8 Semitones, the Sample Rate is just over two and a half times the pitch of Oscillator1. This produces a particularly aggressive lo-fi metallic-sounding digital synth texture, which sounds like:


Download the Low Sample Rate Distortion patch here.

Sunday 14 June 2009

Featured Artists: Protonica on Aspect

Our Featured Artists page is now up, together with praise for the Aspect semi-modular synth courtesy of our first featured artist, Piet Kaempfer from acclaimed Progressive Trance duo Protonica.

Piet says, "Aspect got my attention with its stylish, clear design. It's a genuine synth with its own character." Read what else Piet had to say about Aspect here.

Friday 12 June 2009

Apple Mac PowerPC support

Apple's new iteration of their OS X operating system, OS X v10.6 "Snow Leopard", is fast approaching its release date. And with it, two revelations concerning those who want to upgrade. First, the upgrade price is a mere $29. Secondly, this is the first Mac OS X release to not support the PowerPC architecture. That's right: OS X 10.6 is for Intel users only.

However, all our existing products will continue to be supported on PowerPC processors. And for the foreseeable future, all new products (of which we have several in development) will still be provided in Universal Binary format and run on both Intel and PowerPC architectures.

Tuesday 9 June 2009

Modular Synth Patching in Aspect, part 1

What is Modulation?
Aspect's flexible patching and modulation system can be a source of confusion to users more used to synthesizers with a fixed architecture. In synthesis, to modulate a parameter means to change the parameter's value whilst the sound is playing. This adds interest to what would otherwise be dull, static sounds. Most synth users are familiar with the basic modulation sources - envelopes and LFOs (low frequency oscillators). One common arrangement is the modulation of an oscillator's pitch by an LFO, producing vibrato. Another is the modulation of a filter's cutoff frequency by an envelope, resulting in a sound that has varying degrees of brightness as the higher frequencies are dynamically removed.

The Aspect Semi-Modular Synthesizer
Aspect is a synthesizer in the tradition of semi-modular synthesizers like the Korg MS-10 and Korg MS-20. The appeal of these instruments is not only in their fantastic analogue sound, but in their versatility. Re-routing means that any nearly any component can be used as a modulation source. The Patch panel expands this concept by allowing modulation sources to be combined and transformed in various ways. Download Aspect for Windows, Mac OS X, and Linux, in Audio Unit, VST, and RTAS Plugin formats.

Modulating Parameters
Rather than a confusing web of patch cables strung between modulation sources and parameters, Aspect uses a wireless modulation system. Modulation sources for a Parameter are clearly displayed with both their name and Modulation Depth (the amount that a Modulation Source alters a Parameter). The Depth for a particular parameter is listed in relevant units. For example, Modulation Depth for an Oscillator is specified in semitones. In the following screenshot, we can see that Oscillator1 is modulated 12 semitones by LFO2:

Oscillator modulated by an LFOThe basic steps for routing Modulation Sources in Aspect are as follows:

To assign a Modulation Source to a Parameter:
  • Left-click the Parameter's Modulation combo box.
  • Select the required Modulation Source from the drop-down list.
To remove a Modulation Source from a Parameter:
  • Left-click on the Parameter's Modulation combo box.
  • Select 'Off' from the drop-down list.
To change the the Modulation Depth for a Parameter:
  • Left-click and drag the Parameter's Modulation Depth rotary control upwards to increase the Modulation Depth, or downwards to decrease it. Holding Shift whilst dragging allows fine resolution changes to be made.
The Inverter Components
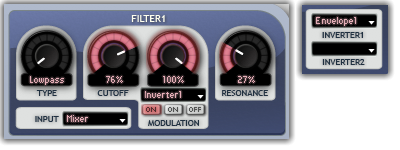
Aspect has 2 Inverter components, Inverter1 and Inverter2, both of which perform the same function. They take a Modulation Source and output a signal that equal to the input source flipped upside down. The following diagram illustrates this concept:

Inverter ADSR Envelope Shape in Aspect
One typical use of an inverted Envelope shape is in the creation of pad sounds. Here we have a pad sound through a Lowpass Filter, with the Filter's Cutoff modulated by an inverted Envelope shape. This creates a sound with an unconventional flourish at the end: where a pad normally grows duller during the Release stage as the Filter is closed, here it gets brighter during Release as the Filter opens.


Download the Inverter Filter Pad Sound patch here.


Inverter Filter Envelope with a Pad SoundHere is another example of an inverted Modulation Source. This tutorial on sequencing with a modular synthesizer uses an inverted Sawtooth LFO routed to the Output Amplifier to produce a quick Attack and slow Decay repeating envelope shape.

Because all signals within Aspect can be used for Modulation purposes, even MIDI control data such as Note Pitch and Velocity can be inverted. The following Program illustrates this:
  • Start with an empty Program by clicking File / New Program.
  • Assign Note Pitch to Inverter1.
  • Replace Oscillator1's Note Pitch Modulation Source with Inverter1.
The Oscillator is now controlled by the inverted Note Pitch. As you move up the keyboard, the pitch of the oscillator decreases!

Inverted Note Pitch modulation in the Aspect VST PluginDownload the Inverter Keyboard patch here.

The Multiplier Components
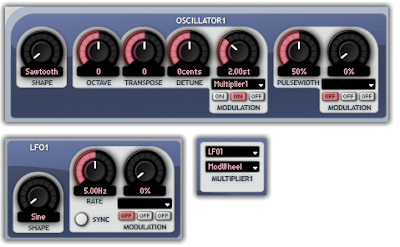
Aspect has 2 individual Multipliers units, Multiplier1 and Multiplier2. Both of these take two Modulation Sources and produce an output that is equal to the product (multiplication) of the inputs. This is particularly useful for producing scaled Modulation Sources. For example, assigning both LFO1 and the Mod Wheel Modulation Source to a Multiplier produces an LFO output with a Depth can be controlled with the Mod Wheel:
  • Set LFO1 to a rate of 5Hz.
  • Set the first input of Multiplier1 to LFO1, and set the second to Mod Wheel.
  • Set Oscillator1's second Pitch Modulation Slot to Multiplier1, with a Depth of 2 semitones (Modulation Slot 1 is left assigned to Note Pitch so that the Oscillator will still track the keyboard.)
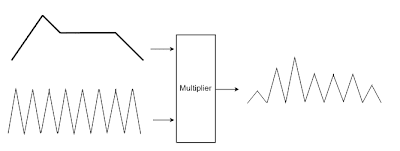
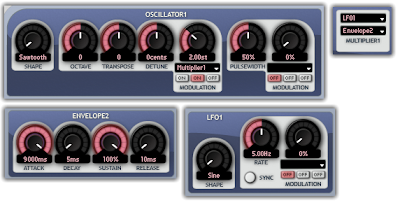
Mod Wheel  controlling the LFO Depth in AspectLFOs that gradually fade up to their maximum Depth is another often used synthesis technique. Multiplying an LFO by an Envelope will accomplish this. In this case, the Envelope shape should have maximum Sustain. The Envelope's Attack parameter will govern how long it takes to fade in:

Multiplying an LFO by an Envelope
The Aspect Plugin fading in the depth of an LFO
Part 2 of this tutorial will cover the remaining Patch Components, which are the Lag Generator, the Sample & Hold unit, and the Adders.

Monday 1 June 2009

Recreating Boards of Canada's Roygbiv Bassline

Boards of Canada's Music Has the Right to Children is an album full of intriguing synthesizer lines and processed sampled sounds. Perhaps the most recognizable is from Roygbiv; a phat, laid-back slice of analogue nostalgia. Roygbiv, the name taken from a mnemonic for remembering the orders of colours in the visible spectrum, opens with a deceptively simple bass sound. It is this bass that we will recreate.

Whilst the Scottish two-piece are notoriously cagey about techniques and equipment, they are known to make good use of analogue synths. The bass in question is likely a Roland SH-101. Aspect excels at recreating these analogue style sounds. The Aspect evaluation can be downloaded here in VST Plugin, Audio Unit, RTAS, and Standalone formats for Mac OS X, Windows, and Linux.

Start, as all good sound designers generally do, with the initial patch by choosing New Program under the File menu.

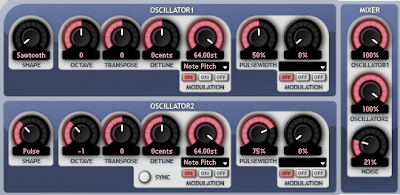
The bass is obviously monophonic, so leave the Polyphony set to 1. The general rule for subtractive synth sound creation is, start with the oscillators. Oscillator1, set to 100% in the Mixer, should be dialed to Sawtooth. Oscillator2, also 100% in the Mixer, should be set to the Pulse shape with a Pulsewidth of about 75%, and detuned down an octave (turn Oscillator2's Octave rotary to -1). Finally, a little noise helps add some grit to the sound: set the Noise level in the Mixer to about 21%.

Oscillator settings for Roygbiv bass
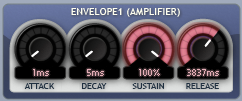
The bass sound has a fairly simple amplitude envelope shape. Set Envelope1's Attack and Decay to their lowest setting (1ms and 5ms, respectively). Set Sustain to 100%, and Release to about 4000ms. This gives a punchy bass sound with a fairly long tail.

Envelope settings for Boards of Canada's Roygbiv bass
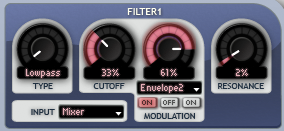
Even small changes to the filter produce huge changes in this sound. As is normally the case with bass sounds, we'll use a Lowpass filter. Set the Filter1's Cutoff to 33%, and set the keyboard tracking modulation (called Note Pitch in the modulation menu) to about 75%.

Sounds nice, but lacks Roygbiv's growl. We can fix that. Assign Envelope2 to Filter1's modulation with a depth of 61%. The appropriate envelope shape should have a quick Attack and a slow Decay/Release. Let's use Attack 25ms, Decay 2500ms, Sustain of 45%, and Release of 3000ms. A filter Resonance of about 2% adds the necessary bite to the sound.

Boards of Canadas Roygbiv bass filter
A few last tweaks introduce some analogue authenticity. A slow wavering of the pitch adds some subtle warmth to the sound. Set LFO1 to a rate of about .30Hz, and route it into Oscillator1's second Pitch Modulation Slot with a depth of a few cents (0.02 semitones sounds good). Likewise, set LFO2 to a rate of about .10Hz, and route it into Oscillator2's second Pitch Modulation Slot, this time with a depth of about 0.09st.

Aspect's second filter can be used to grunge up the sound a tad. Route Filter1 into the Input of Filter2, and set Filter2 to Highpass with a Cutoff of 0%. The Output Filter Mix should be about 15% to add a small amount of the high-passed signal into the chain.

Finally, turn on Always Glide in the Global section, and set Glissando to 12%. This provides the sliding movement between two consecutive notes played at different pitches.

So here is the Roygbiv subtractive synth patch for Aspect, and this is what the recreation sounds like.


The fairly heavy reverb present in the original song is here provided by Apple Logic's AVerb plug-in. Adding a warm tape-style compression and some subtle eq would likely produce a more authentic sound. This is left as an exercise for the reader.