This tutorial covers the basics of unison mode in Aspect. Aspect is available for Mac OS X, Windows, and Linux in Audio Unit, VST Plugin, and Standalone formats. Download the Aspect evaluation here. The evaluation version is all that is required for following the tutorial. However, only registered users will be able to open the example patches accompanying this article.
Aspect's Unison control is at the bottom right of the Aspect interface, next to the Polyphony control. This is no coincidence: unison is closely related to polyphony. With Unison set to '1 (Off)', Aspect acts a traditional polyphonic instrument. Each note played uses one voice of polyphony. Increasing the value of the Unison control increases the number of voices in a note. For example, setting Unison to '2' means that each note played will result in using two polyphonic voices.
Stacking voices is only useful when each voice is different. Five voices, all producing exactly the same sound, simply sounds like a louder version of one voice. The key to a powerful or interesting unison sound is in the differences between each voice. In Aspect, this variation comes from using the UnisonDepth modulation source to give each voice its own sound.
Supersaw
The first unison sound we will create is perhaps the most recognizable, and certainly the simplest: the supersaw. As you will recall from the introduction, the supersaw is created by stacking a large numbers of detuned sawtooth oscillators.
Start with the default patch (click on File, and then New Program). This gives a very basic starting sound of a single oscillator routed into a fully opened lowpass filter. Whilst not interesting in itself, it's an ideal base upon which to build more complex patches. Set the Unison to 5 voices by clicking on the Unison control and dragging upwards. Likewise, set the Polyphony to 20, and turn the Volume down slightly. The Global section should now look something like this:

In order to detune each voice, we now need to assign the UnisonDepth modulation to the Oscillator pitch. The first modulation slot has been assigned to Note Pitch, so we'll move onto the second. Click on Oscillator 1's second modulation slot (the white button in the middle that says 'Off', slightly below and to the right of the Detune control). Then click on the combo box above the button, and select 'UnisonDepth' from the modulation source list. Now, whilst playing a note, increase the modulation depth by turning the rotary control. Notice that as the UnisonDepth increases, the detuning becomes more prominent and the sound becomes fatter.
Now let's do the same to Oscillator 2. First of all, ensure that Oscillator 2 is routed into the main mix by turning up the Oscillator 2 control in the Mixer. Feel free to tweak each Oscillator's Octave, Tranpose, and Detune controls until you find a suitably big sound.
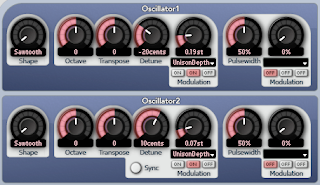
Choosing a suitably plucky Envelope 1 shape produces the following sound:
Download the Supersaw patch here.
Panning
Whilst the supersaw may be impressively big sounding, we can do better. Panning each voice around the stereo panorama produces a wider, more encompassing sound. The following steps detail how to use UnisonDepth to pan voices:
- Set the Pan control in the Output section all the way to the left.
- Route the UnisonDepth modulation source to the first Pan modulation slot.
- Set the first pan modulation depth to 25%. The Pan position is represented as a percentage: 0% meaning panned hard left, 50% in the middle, and 100% panned far right. By setting the pan modulation to 25%, each voice will be placed as follows:
- First voice, 0%, left.
- Second voice, 25%, halfway between the far left and middle.
- Third voice, 50%, middle.
- Fourth voice, 75%, halfway between the far right and middle.
- Fifth voice, 100, right.
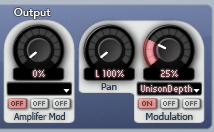
Which sounds like this:
Download the Panned Supersaw patch here.
Unison Chords
Detuning each voice by a small amount, such as few cents, gives the impression of one fat sounding note. But rather than detuning oscillators by small amounts, we can also detune by much larger values. Detuning by semitones, for example, can create chords from single notes.
- Start with a new, empty, program ( File / New Program).
- Set the Unison to 2 and Polyphony to 12.
- Route Oscillator 2 into the mix by increasing the Mixer / Oscillator 2 control.
- Transpose Oscillator 2 by 3 semitones.
- With Oscillator 1, select UnisonDepth as the second modulation source and increase the depth to 7.00 semitones. Note that any rotary control can be finely tuned by holding down shift whilst dragging it.
- With Oscillator 2, select UnisonDepth as the second modulation source and increase the depth to 7.00 semitones.
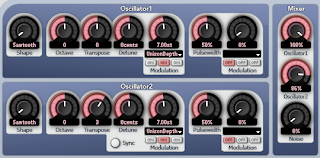
Each note played will now produce a four note chord, which sounds like:
Download the Unison Chords patch here.
Additive Synthesis
Additive Synthesis involves mixing together sine waves of different frequencies to produce complex waveforms. A simple additive instrument to emulate is the drawbar organ - by combining just six sine waves, a convincing Hammond organ sound can be produced.
- Start with a new, empty, program ( File / New Program).
- Set Unison to 3, and Polyphony to 12
- Route Oscillator 2 into the mix by increasing the Mixer / Oscillator 2 control to 100%.
- Set both Oscillator 1 and Oscillator 2's shape to 'Sine'
- Set Oscillator 1's second modulation slot source to UnisonDepth, and set a depth of 12 semitones.
- Transpose Oscillator 2 down -3 Octaves, and set its second modulation slot source to UnisonDepth, and set a depth of 12 semitones.
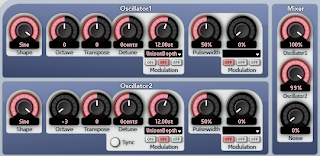
This will produce a sound that is a combined series of six sine waves, each an octave above the last. This sounds like:
Download the Sine Organ patch here.
Filter Mix
The Filter Mix modulation slots allow each voice within a unison note to have different mixes of Filter 1 and Filter 2. In the following example, a two voice unison note is split so that one voice consists of Oscillator 1 routed through Filter 1 and panned hard left. The second voice consists of Oscillator 2 routed through Filter 2 and panned hard right.
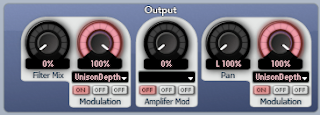
In this instance, the first voice is a simple bass note, whilst the second is a simple 2 note arpeggio. Altogether, this sounds like:
Download the Filter Mix patch here.
Formant Filters
Formants are resonant peaks within the spectrum of a sound. It is the formants caused by the mouth, vocal and nasal tracts that gives speech, particularly vowels, their identifying sound. Vowel formants can be approximated by using four parallel bandpass filters. Whilst Aspect may only have two Filters per voice, by using two unison voices per note we get the required four bandpass filters.
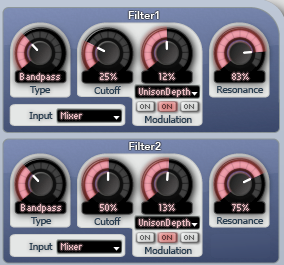
This has a distinctly vocal flavour to the sound:
Download the Formant Filter patch here.
Conclusion
Aspect's unique architecture and UnisonDepth modulation source offer practically limitless flexibility. Stacking unison voices is a simple way to extend the limitations of two oscillators and two filters per voice. Variations within each voice is the key to producing interesting unison sounds.
It's all clear now, thanks!
ReplyDeleteAnd it's great news to have more control over the phase in Aspect2. I'm already enjoying PWM
Best regards