A trifecta of news updates:
Aspect has now been updated to 1.5.0, which aside from all the bug fixes and improvements, also includes the vastly better oscillators that were previewed a few weeks back. Download it here.
Secondly, some audio demoes of various Aspect sample sounds have been posted on the Aspect page.
And finally, String for Windows has been updated to 1.0.3. This fixes a bug that seemingly only occurs under Sonar where notes are left hanging when the Transport is stopped. There is no reason to upgrade from 1.0.2 if you aren't using Sonar or witnessing this bug. Download here.
Sonar handles Transport stops slightly differently from other hosts. It's certainly not wrong according to the MIDI spec, but it's definitely unconventional. Instead of keeping a list of all playing notes and sending each a corresponding MIDI Note-Off when the Transport is stopped, Sonar just sends a single MIDI All Notes Off message. Any plugins that only respond to MIDI Note-Off messages and ignore MIDI All Notes Off message will manifest this hung notes problem. Aspect and String both handle this correctly since their most recent updates.
Thursday, 17 December 2009
Sunday, 13 December 2009
String 1.0.2 now released
Version 1.0.2, a minor update for String, is now available - download for the platform of your choice here. String 1.0.2 contains a fix for a problem where using Chorus Type 2 with a Depth of 100% could, in certain circumstances, cause some unpleasant digital noise to occur.
Sunday, 6 December 2009
New oscillators preview
A sneak preview of some new oscillators. These have several advantages over the current Aspect oscillators:
- Reduced CPU usage: They use, on average, about 30% less CPU resources. When taking the rest of Aspect's synthesis path into account, this translates into approximately a 10% reduction in CPU resources for a patch.
- Reduced memory usage: Overall memory usage for oscillators is reduced by an impressive 80%, although this doesn't have much of an impact to the user.
- Reduced aliasing and foldover noise: Aliasing and foldover noise at the ultra high end of the frequency range is reduced to practically negligible amounts. Here are two examples. Note that these are unfiltered raw oscillator sweeps, so ensure that your volume is at an acceptable level.
The first example is a sawtooth sweeping from the low to the high frequency range, and then back again:
The second example is a pulse wave with a duty cycle of 50% sweeping as in the previous example:
- Removed DC Offset: There is no DC offset when sweeping the pulse-width of the Pulse waveform.
- Reduced Sync Folderover Noise: Aliasing that could occur during an oscillator sync is significantly reduced.
- Awesome sound: We can't quantify this one, so let your ears be the judge. Here are two raw sawtooth oscillator, with no filtering, tuned octaves apart. The pitch of one oscillator is slowly detuned relative to the other to introduce beating:
Tuesday, 1 December 2009
Loomer String released
Loomer String Synthesizer is now available for purchase and to demo: enjoy!

String is a dual layer, polyphonic string ensemble synthesizer available for Mac OS X, Windows, and Linux, in Audio Unit, RTAS, and VST Plugin formats, as well as in standalone application format. String's marvelous interface comes courtesy of freelance graphic designer Inquer. More information about String, as well as audio samples and a free trial download can be found here.
The trial version has the following demo limitations:
- User created Program and Bank presets can be saved, but not loaded back into the evaluation. They can however be loaded by a registered copy of String.
- Output will be periodically interrupted, approximately every 30 seconds, by a short moment of silence.
- Audio output will stop after 30 minutes of continuous use. String must be restarted to continue evaluation.
Friday, 27 November 2009
Loomer String Synthesizer
We're proud to announce our next product, String. String is a virtual instrument that emulates the beautiful sound of the polyphonic string synthesizer. Its authentic tone comes from its accurate emulation of the divide-down oscillator technology and bucket-brigade chorus units behind the lush ensemble synths of the 70s.

All being well, String should be available early next week for purchase at £50 (+ VAT if applicable). String comes in VST, Audio Unit, RTAS and Standalone formats for Windows, Mac OS X, and Linux.
Here are a few teasers of the type of sounds String does so well. All are from a single String instance, recorded dry, and only using String's built in effects. (Note that the first example also has a simple backing drum beat courtesy of some Korg Minipops samples taken from www.freesound.org.)
Sunday, 18 October 2009
Beat Mangling with Pure Data
Presented here is a patch for beat mangling loops using Pure Data, a free and open-source successor to MAX/MSP. Beatmangle, using a single audio loop, produces persistently changing audio by randomly moving the play head and loop settings. This is a particularly effective technique for generating Squarepusher style beats.

Here's the patch in action using a two bar drum n bass loop sample from Computer Music UK magazine (issue 128, Groove Criminals Beat 2, if you're interested.)
Patch analysis can be loosely broken down into five parts; sample loading, sample playback, loop position marker display, randomization of the playback position, and randomization of the loop.
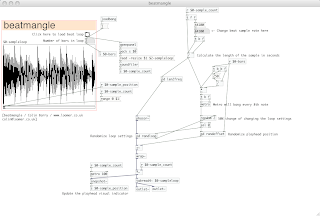
Sample Loading
The Open File browser is displayed by sending a bang to an openpanel object, which in turn sends a message containing the selected filename. A soundfiler object then reads the audio sample into the specified array in response to the read message. We specify the -resize flag in our message to soundfiler to inform the array to set the correct size required for the selected audio file. The size of the audio file, in samples, is output by the soundfiler object, a value which is accessible elsewhere in the patch with the r $0-sample_count recieve objects.
Sample Playback
The sample loop is played back using a phasor~ which provides an index to a tabread4~ object. The phasor~ generates a floating point signal that ranges from 0.0 to 1.0, which is then multiplied by the number of samples in our audio file to give a range between 0.0 and the number of samples.
To play back the sample at its original tempo, we set the phasor~ to run at a frequency so that a single phasor~ period takes the same time as a single cycle of the loop. This frequency, the reciprocal of the loop length in seconds, is calculated in the len2freq subpatch.
Loop Position Marker Display
A hslider (horizontal slider) object shows the current playing position beneath the waveform display. The slider range is set in response to a sample_count message (ie, when a new audio file is opened.) The current play index of the scaled phasor~ is sampled using a snapshot~ object, which periodically generates a value in response to a metro object running at 10 frames per second. The position of the hslider thumb is updated to reflect this value.
Randomization of the Playback Position
There is a 50% chance that randomization occurs every 8th note. A random 2 and sel 0 object pair ensures that only half of the metro bangs are processed. The offset is calculated by taking the number of bars in the loop, multiplying by 8 to get the number of 8th notes, and generating a random number in this range. This is then scaled back by dividing by the number of 8th note to give a 8th note quantized phase position in the range 0.0 to 1.0. This is all contained in a randoffset subpatch. The phase offset is then added to the raw phasor~ output (with a +~ object), and then wrapped to the range 0.0 to 1.0 with a wrap~.
Randomization of the Loop
Loop randomization, contained in the randloop subpatch, adds quick staccato drum n bass style noises to the audio. This is randomly done by multiplying the phasor~ by 1, 2, 4, 8, 16, 32, 64, or 128, wrapping this via a wrap~ object to the range 0.0 to 1.0, and then dividing down again by the previous multiplier. This process effectively shortens the period of the phasor so that it loops over a half, a quarter, an eighth, a sixteenth, etc, of the entire length of the sample.
Finally, when a 64th note or 128th note loop is randomly selected, we also increase the chance of randomization in the previous stage from 50% to 100%. This significantly reduces the chance of long sections of 'machine gunning' (a sound which gets grating fairly quickly if overused) when fast looped notes continually play.
Download the beatmangle Pure Data patch here.

Patch analysis can be loosely broken down into five parts; sample loading, sample playback, loop position marker display, randomization of the playback position, and randomization of the loop.

The Open File browser is displayed by sending a bang to an openpanel object, which in turn sends a message containing the selected filename. A soundfiler object then reads the audio sample into the specified array in response to the read message. We specify the -resize flag in our message to soundfiler to inform the array to set the correct size required for the selected audio file. The size of the audio file, in samples, is output by the soundfiler object, a value which is accessible elsewhere in the patch with the r $0-sample_count recieve objects.
Sample Playback
The sample loop is played back using a phasor~ which provides an index to a tabread4~ object. The phasor~ generates a floating point signal that ranges from 0.0 to 1.0, which is then multiplied by the number of samples in our audio file to give a range between 0.0 and the number of samples.
To play back the sample at its original tempo, we set the phasor~ to run at a frequency so that a single phasor~ period takes the same time as a single cycle of the loop. This frequency, the reciprocal of the loop length in seconds, is calculated in the len2freq subpatch.
Loop Position Marker Display
A hslider (horizontal slider) object shows the current playing position beneath the waveform display. The slider range is set in response to a sample_count message (ie, when a new audio file is opened.) The current play index of the scaled phasor~ is sampled using a snapshot~ object, which periodically generates a value in response to a metro object running at 10 frames per second. The position of the hslider thumb is updated to reflect this value.
Randomization of the Playback Position
There is a 50% chance that randomization occurs every 8th note. A random 2 and sel 0 object pair ensures that only half of the metro bangs are processed. The offset is calculated by taking the number of bars in the loop, multiplying by 8 to get the number of 8th notes, and generating a random number in this range. This is then scaled back by dividing by the number of 8th note to give a 8th note quantized phase position in the range 0.0 to 1.0. This is all contained in a randoffset subpatch. The phase offset is then added to the raw phasor~ output (with a +~ object), and then wrapped to the range 0.0 to 1.0 with a wrap~.
Randomization of the Loop
Loop randomization, contained in the randloop subpatch, adds quick staccato drum n bass style noises to the audio. This is randomly done by multiplying the phasor~ by 1, 2, 4, 8, 16, 32, 64, or 128, wrapping this via a wrap~ object to the range 0.0 to 1.0, and then dividing down again by the previous multiplier. This process effectively shortens the period of the phasor so that it loops over a half, a quarter, an eighth, a sixteenth, etc, of the entire length of the sample.
Finally, when a 64th note or 128th note loop is randomly selected, we also increase the chance of randomization in the previous stage from 50% to 100%. This significantly reduces the chance of long sections of 'machine gunning' (a sound which gets grating fairly quickly if overused) when fast looped notes continually play.
Download the beatmangle Pure Data patch here.
Friday, 11 September 2009
Hear Resound
A number of short audio demos of Loomer Resound have been uploaded to the Resound product page. We have an ARP Odyssey synth line through a fairly noisy delay; a snappy drum beat is pitch shifted, dub-style; a tremelo Rhodes riff is looped using reverse delay mode and feedback.
Additionally, a composite audio sample player - containing demos from all our products* - has been included on the Loomer front page.
*Loomer Aspect audio demos will be coming shortly...
Additionally, a composite audio sample player - containing demos from all our products* - has been included on the Loomer front page.
*Loomer Aspect audio demos will be coming shortly...
Sunday, 6 September 2009
Using MIDI Controllers with Effect Plugins in Renoise
Configuring Renoise effect plugins to use an external MIDI controller is by no means a tricky process, but, judging by the number of queries we get from users who've run afoul of it when using our effects, we felt it was worth a short walk-through.
The trick with Renoise effects is: when using an effect as a Track DSP, route the MIDI messages to the track effect via an FX Alias instrument.
Here we will be using Loomer Shift, our diatonic pitch shifter delay effect VST/Audio Unit plugin, as a Renoise Track DSP. We want to map Delay 1's chromatic Transpose Parameter to our external MIDI controller. First step, add Shift as an insert Track DSP to the desired channel.

In the lower pane of Renoise, change to the Instrument Settings tab. From the AU/VST Instrument Properties, choose Shift from the FX Alias category.
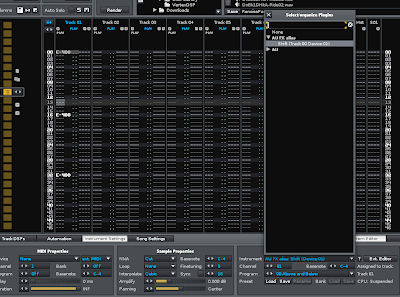
Return to the Track DSPs tab, and launch the Shift GUI by clicking "Ext. Editor". Because MIDI messages are routed (via the FX Alias) to Shift, you should now be able to map the parameters. Under Options, choose "Start MIDI Learn", click on the Shift parameter you want mapping - in this case, Delay 1 Transpose - and turn your controller's knob. The MIDI Controller ID should be displayed in yellow underneath the parameter. You can continue clicking on parameters and turning controller knobs in order to map more parameter. To leave MIDI learn mode, choose "Stop MIDI Learn" under the Options menu.
 A mapped knob on your MIDI controller should now control its corresponding parameter.
Tuesday, 1 September 2009
Rekkerd.org reviews Aspect
"I am finding myself firing it up in just about every new project I start" says Rekkerd.org in their review of Aspect. Read the full text here.
Friday, 28 August 2009
Manifold audio samples
A number of people have commented on the lack of audio samples on our product pages. So, due to popular request, mp3s have been added to the Loomer Manifold page. Audio demos for Loomer Aspect and Loomer Resound will be coming shortly.
Tuesday, 25 August 2009
Aspect 1.4.2 released
Available as of now at the Loomer website, Aspect 1.4.2 is a minor update that contains a few fixes and enhancements:
- An uninstallation script is now available for the Mac OS X version. This script, when ran, will completely remove any installed Aspect components.
- Fixed an issue when the Aspect VST plugin is hosted by Reaper which could cause audio glitches when either changing programs, or editing Aspect parameters.
- Any notes playing when the host transport is restarted are now stopped.
Saturday, 22 August 2009
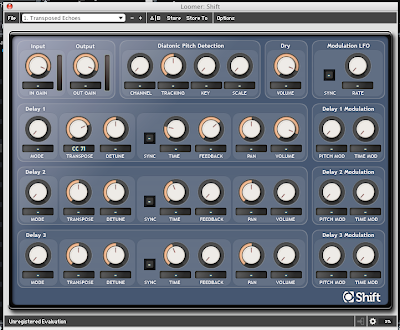
Shift: Diatonic, Pitch Shifted Delays
Loomer Shift, our new granular diatonic pitch shifter and delay effect has been released. As usual, it’s available for Windows, Mac OS X, and Linux, and comes in a numerous amount of plug-in formats (VST, Audio Unit, RTAS, and Standalone.)
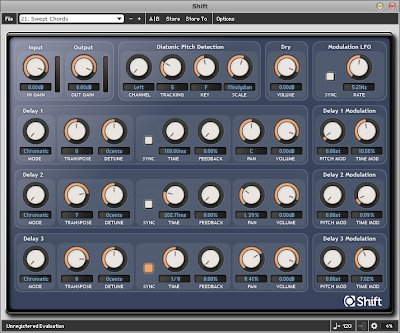
Shift has three independent delay lines, each one combining a fully fledged bucket brigade device style delay with a granular pitch shifter. Three different pitch shifting modes are available - in both Chromatic and Recursive modes the pitch shift amount is specified in semitones and cents, the difference between them being that in Chromatic mode the delay feeds back into itself, whilst in Recursive mode the delay feeds back into the pitch shifter. Finally, in Diatonic mode pitch shift is specified in diatonic intervals (eg, Unison, Second, Third) of a selected key and scale. The monophonic audio tracker then chooses the appropriate pitch shift in order to produce a harmony that is in key.
The free evaluation can be downloaded here, or, if you’re so inclined, a few choice audio examples can be heard here.
Wednesday, 12 August 2009
Resound 1.3.4 released
Resound, our vintage sounding delay unit, has been updated to 1.3.4. Download the latest version for Mac OS X, Windows, or Linux in VST, Audio Unit, RTAS Plugin or Standalone application format.
This new version has fixes for a few minor issues:
This new version has fixes for a few minor issues:
- Fixed pulsing noise that could occur when running at sample rates other than 44100Hz.
- Delay tails are now curbed when the host sequencer transport is restarted.
Wednesday, 8 July 2009
Aspect 1.4.0 released
Aspect has been updated to 1.4.0. This release adds a few minor fixes and features:
The sustain MIDI controller acts in a similar fashion to a sustain pedal on a piano, allowing notes to be sustained indefinitely whilst the sustain is on and releasing when sustain is switched off.
Lag Generator
The Lag Generator can now be used as an audio source. To route the Lag Generator audio into the main Aspect audio stream, choose Lag Generator as the audio input for either Filter1 or Filter2. When used on an audio source, the Lag Generator acts as a very simple lowpass filter with the cutoff frequency dropping as the Lag parameter increases.
Aspect is available as a download for Mac OS X, Windows, and Linux, in Audio Unit, RTAS, VST Plugin, and Standalone application format.
- Support for the sustain MIDI controller.
- Lag Generator component now only filters audio rate modulation sources when the Lag is set to above 0%.
- Lag Generator output can now be used as an audio source, as well as a modulation source.
The sustain MIDI controller acts in a similar fashion to a sustain pedal on a piano, allowing notes to be sustained indefinitely whilst the sustain is on and releasing when sustain is switched off.
Lag Generator
The Lag Generator can now be used as an audio source. To route the Lag Generator audio into the main Aspect audio stream, choose Lag Generator as the audio input for either Filter1 or Filter2. When used on an audio source, the Lag Generator acts as a very simple lowpass filter with the cutoff frequency dropping as the Lag parameter increases.
Aspect is available as a download for Mac OS X, Windows, and Linux, in Audio Unit, RTAS, VST Plugin, and Standalone application format.
Monday, 22 June 2009
Modular Synth Patching in Aspect, part 2
We continue from where we left off at the end Part 1; exploring the Patch and Modulation capabilities of the Aspect semi-modular synth. This article will cover the last three components in the Patch section; the Lag Generator, the Adders, and the Sample and Hold unit. Download Aspect for Windows, Mac OS X, and Linux, in Audio Unit, VST, and RTAS Plugins formats.
The Lag Generator Component
The Lag Generator slews the input Modulation Source, reducing the speed of changes. Similar to how Glissando causes note pitches to slide into one another, the Lag Generator can be used to make any Modulation Source slide. As the Lag Parameter increases, more time is taken for the Modulation Source to slide between changes.
Slewed Filter Cutoff
This example uses the Lag Generator to slew a Square waveform LFO which is modulating the Cutoff Frequency of a Lowpass Filter.
 Hold down a note whilst slowly increasing the Lag Parameter. At low values of Lag, the Modulation Source still resembles a Square waveform. As Lag increases, the Square wave is softened and audible slides between the high and low values of the waveform can be heard. At higher values of Lag, the waveform starts to resemble a Sine, and eventually reaches a constant when the Lag is so much that any changes are too small to be heard.
Download the Slewed Filter Cutoff Patch here.
Emulating a Magnetic Tape Player
This example uses the Lag Generator to filter the White Noise Modulation Source. This creates a signal that slowly moves between random values (this type of movement is called Brownian Motion.) When used to modulate Pitch, this generates a meandering, detuned effect similar to the wow and flutter of an old tape recorder.
Download the patch here.
The Adder Components
The Adder components, Adder1 and Adder2, each take two Modulation Sources and produce a signal that is equal to the sum of the inputs. Because Parameters are already able to sum Modulation Sources (due to the fact that they all have three independent Modulation Slots), the Adder components may seem of little use. However, there are occasions when combining Modulation Sources outside of Parameter Modulation Slots is useful:
You may wish to connect several Modulation Sources to a component that only has one input connector (such as the Lag Generator, Sample & Hold, or Inverter components). Use an Adder to combine the Modulation Sources, and then connect this single Modulation Source to the chosen component.
If all of a Parameter's Modulation Slots have been assigned, and you need to add another Modulation Source, you can combine multiple Modulation Sources into a single one with an Adder. This single Modulation Source will allow two Modulation Sources to use up only one Modulation Slot in a Parameter.
The Adder can be used to combine signals to produce custom waveforms. This waveform can be fed directly into either Filter by choosing Adder1 or Adder2 from the Filter's input selector. The following example creates a waveform by subtracting one slightly detuned oscillator from the other:
 By summing an out-of-phase Sawtooth Oscillator with an inverted Sawtooth, we get a Pulse waveform. To add a bit of time-varying interest to the sound, an LFO will be used to add movement to one of the raw Oscillator sources:
Download the patch here.
The Sample and Hold Component
The purpose of the Sample and Hold (S&H) component is to keep a Modulation Source's value steady for a short time. The component takes two inputs, a Source and Clock; whenever the S&H Clock input source changes from a negative to a positive value (known as a zero-crossing), the current value of the S&H Input source will be taken and held steady until the next zero-crossing.
Here a Noise source is periodically sampled by the Sample and Hold component, with the sampling period controlled by a Sawtooth LFO connected to the Clock input. This creates a Modulation Source that changes to a different random value at the same rate as the LFO. To configure this in Aspect:
 This S&H Noise to Filter creates a classic synth sound you've no doubt heard before:
Download the S&H Filter Patch here.
Sample Rate Reduction with the Sample and Hold Component
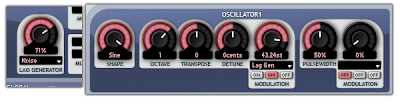
With Aspect, because there is no difference between Audio and Modulation signals the Sample and Hold component could also be used to sample an audio source at a specified clock rate. This distortion is known as Sample Rate Reduction, and produces a lo-fi, crunchy timbre.
 The pitch of Oscillator2, which is used to clock the Sample and Hold component, sets the Sample Rate of Oscillator1. Changing the Pitch of Oscillator2 changes the Sample Rate. At 2 Octaves and 8 Semitones, the Sample Rate is just over two and a half times the pitch of Oscillator1. This produces a particularly aggressive lo-fi metallic-sounding digital synth texture, which sounds like:
Download the Low Sample Rate Distortion patch here.
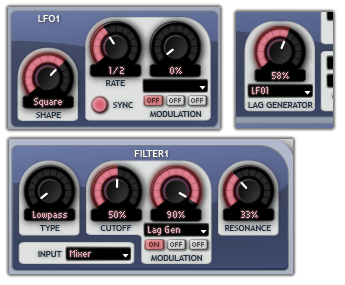
The Lag Generator Component
The Lag Generator slews the input Modulation Source, reducing the speed of changes. Similar to how Glissando causes note pitches to slide into one another, the Lag Generator can be used to make any Modulation Source slide. As the Lag Parameter increases, more time is taken for the Modulation Source to slide between changes.
Slewed Filter Cutoff
This example uses the Lag Generator to slew a Square waveform LFO which is modulating the Cutoff Frequency of a Lowpass Filter.
- Set LFO1 to Square shape, and Sync it to a rate of 1/2.
- Connect LFO1 to the Lag Generator.
- Change Filter1's Cutoff to about 50% and Resonance to about 30%.
- Connect the Lag Generator Modulation Source to the Cutoff Modulation, with a Depth of about 90%.
 Hold down a note whilst slowly increasing the Lag Parameter. At low values of Lag, the Modulation Source still resembles a Square waveform. As Lag increases, the Square wave is softened and audible slides between the high and low values of the waveform can be heard. At higher values of Lag, the waveform starts to resemble a Sine, and eventually reaches a constant when the Lag is so much that any changes are too small to be heard.
Download the Slewed Filter Cutoff Patch here.
Emulating a Magnetic Tape Player
This example uses the Lag Generator to filter the White Noise Modulation Source. This creates a signal that slowly moves between random values (this type of movement is called Brownian Motion.) When used to modulate Pitch, this generates a meandering, detuned effect similar to the wow and flutter of an old tape recorder.
- Connect the Noise Modulation Source to the Lag Generator.
- Set the Lag to about 70%.
- Oscillator1 should be a Sine shape, with a Pitch of 1 Octave up.
- Connect the Lag Generator Modulation Source to Oscillator1's Second Pitch Modulation Source with a Depth of about 40 semitones.

Download the patch here.
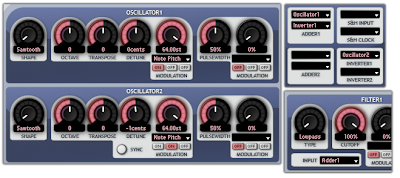
The Adder Components
The Adder components, Adder1 and Adder2, each take two Modulation Sources and produce a signal that is equal to the sum of the inputs. Because Parameters are already able to sum Modulation Sources (due to the fact that they all have three independent Modulation Slots), the Adder components may seem of little use. However, there are occasions when combining Modulation Sources outside of Parameter Modulation Slots is useful:
You may wish to connect several Modulation Sources to a component that only has one input connector (such as the Lag Generator, Sample & Hold, or Inverter components). Use an Adder to combine the Modulation Sources, and then connect this single Modulation Source to the chosen component.
If all of a Parameter's Modulation Slots have been assigned, and you need to add another Modulation Source, you can combine multiple Modulation Sources into a single one with an Adder. This single Modulation Source will allow two Modulation Sources to use up only one Modulation Slot in a Parameter.
The Adder can be used to combine signals to produce custom waveforms. This waveform can be fed directly into either Filter by choosing Adder1 or Adder2 from the Filter's input selector. The following example creates a waveform by subtracting one slightly detuned oscillator from the other:
- Detune Oscillator2 by -1 cent.
- Connect Oscillator2 to Inverter1.
- Link Oscillator1 and Inverter1 into Adder1's inputs.
- Choose Adder1 as the input to Filter1.
 By summing an out-of-phase Sawtooth Oscillator with an inverted Sawtooth, we get a Pulse waveform. To add a bit of time-varying interest to the sound, an LFO will be used to add movement to one of the raw Oscillator sources:
- Set LFO1 to Square, and Sync it to a rate of 1/4.
- Link LFO1 to a one of Oscillator2's spare Pitch Modulation Slots, and give it a Modulation Depth of 12.00 semitones (remember: holding Shift will allow finely grained changes to be made to controls.)
Download the patch here.
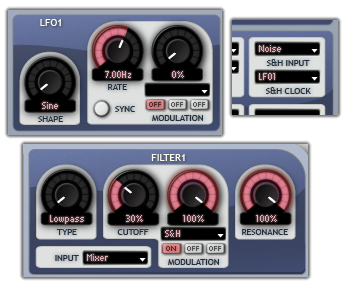
The Sample and Hold Component
The purpose of the Sample and Hold (S&H) component is to keep a Modulation Source's value steady for a short time. The component takes two inputs, a Source and Clock; whenever the S&H Clock input source changes from a negative to a positive value (known as a zero-crossing), the current value of the S&H Input source will be taken and held steady until the next zero-crossing.
Here a Noise source is periodically sampled by the Sample and Hold component, with the sampling period controlled by a Sawtooth LFO connected to the Clock input. This creates a Modulation Source that changes to a different random value at the same rate as the LFO. To configure this in Aspect:
- Connect the Noise Modulation Source to S&H Input.
- Connect LFO1 to S&H Clock.
- Set LFO1 to a rate of about 7Hz.
- Connect S&H to Filter1's first Modulation Slot with a Depth to 100%.
- Set Filter1's Cutoff to about 30% and Resonance to 100%.
 This S&H Noise to Filter creates a classic synth sound you've no doubt heard before:
Download the S&H Filter Patch here.
Sample Rate Reduction with the Sample and Hold Component
With Aspect, because there is no difference between Audio and Modulation signals the Sample and Hold component could also be used to sample an audio source at a specified clock rate. This distortion is known as Sample Rate Reduction, and produces a lo-fi, crunchy timbre.
- Connect Oscillator1 to the S&H Input, and Oscillator2 to the S&H Clock.
- Select S&H as the Input for Filter1.
- Tune Oscillator2 up by 2 Octaves, and Tranpose is to 8.
- Reduce the digital harshness slightly by setting Filter1 Cutoff to 50% and add a little bite by turning the Resonance to 50%.
 The pitch of Oscillator2, which is used to clock the Sample and Hold component, sets the Sample Rate of Oscillator1. Changing the Pitch of Oscillator2 changes the Sample Rate. At 2 Octaves and 8 Semitones, the Sample Rate is just over two and a half times the pitch of Oscillator1. This produces a particularly aggressive lo-fi metallic-sounding digital synth texture, which sounds like:
Download the Low Sample Rate Distortion patch here.
Sunday, 14 June 2009
Featured Artists: Protonica on Aspect
Our Featured Artists page is now up, together with praise for the Aspect semi-modular synth courtesy of our first featured artist, Piet Kaempfer from acclaimed Progressive Trance duo Protonica.
Piet says, "Aspect got my attention with its stylish, clear design. It's a genuine synth with its own character." Read what else Piet had to say about Aspect here.
Piet says, "Aspect got my attention with its stylish, clear design. It's a genuine synth with its own character." Read what else Piet had to say about Aspect here.
Friday, 12 June 2009
Apple Mac PowerPC support
Apple's new iteration of their OS X operating system, OS X v10.6 "Snow Leopard", is fast approaching its release date. And with it, two revelations concerning those who want to upgrade. First, the upgrade price is a mere $29. Secondly, this is the first Mac OS X release to not support the PowerPC architecture. That's right: OS X 10.6 is for Intel users only.
However, all our existing products will continue to be supported on PowerPC processors. And for the foreseeable future, all new products (of which we have several in development) will still be provided in Universal Binary format and run on both Intel and PowerPC architectures.
However, all our existing products will continue to be supported on PowerPC processors. And for the foreseeable future, all new products (of which we have several in development) will still be provided in Universal Binary format and run on both Intel and PowerPC architectures.
Tuesday, 9 June 2009
Modular Synth Patching in Aspect, part 1
What is Modulation?
Aspect's flexible patching and modulation system can be a source of confusion to users more used to synthesizers with a fixed architecture. In synthesis, to modulate a parameter means to change the parameter's value whilst the sound is playing. This adds interest to what would otherwise be dull, static sounds. Most synth users are familiar with the basic modulation sources - envelopes and LFOs (low frequency oscillators). One common arrangement is the modulation of an oscillator's pitch by an LFO, producing vibrato. Another is the modulation of a filter's cutoff frequency by an envelope, resulting in a sound that has varying degrees of brightness as the higher frequencies are dynamically removed.
The Aspect Semi-Modular Synthesizer
Aspect is a synthesizer in the tradition of semi-modular synthesizers like the Korg MS-10 and Korg MS-20. The appeal of these instruments is not only in their fantastic analogue sound, but in their versatility. Re-routing means that any nearly any component can be used as a modulation source. The Patch panel expands this concept by allowing modulation sources to be combined and transformed in various ways. Download Aspect for Windows, Mac OS X, and Linux, in Audio Unit, VST, and RTAS Plugin formats.
Modulating Parameters
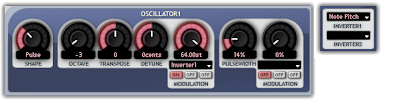
Rather than a confusing web of patch cables strung between modulation sources and parameters, Aspect uses a wireless modulation system. Modulation sources for a Parameter are clearly displayed with both their name and Modulation Depth (the amount that a Modulation Source alters a Parameter). The Depth for a particular parameter is listed in relevant units. For example, Modulation Depth for an Oscillator is specified in semitones. In the following screenshot, we can see that Oscillator1 is modulated 12 semitones by LFO2:
 The basic steps for routing Modulation Sources in Aspect are as follows:
To assign a Modulation Source to a Parameter:
Aspect has 2 Inverter components, Inverter1 and Inverter2, both of which perform the same function. They take a Modulation Source and output a signal that equal to the input source flipped upside down. The following diagram illustrates this concept:
One typical use of an inverted Envelope shape is in the creation of pad sounds. Here we have a pad sound through a Lowpass Filter, with the Filter's Cutoff modulated by an inverted Envelope shape. This creates a sound with an unconventional flourish at the end: where a pad normally grows duller during the Release stage as the Filter is closed, here it gets brighter during Release as the Filter opens.
Download the Inverter Filter Pad Sound patch here.
 Here is another example of an inverted Modulation Source. This tutorial on sequencing with a modular synthesizer uses an inverted Sawtooth LFO routed to the Output Amplifier to produce a quick Attack and slow Decay repeating envelope shape.
Because all signals within Aspect can be used for Modulation purposes, even MIDI control data such as Note Pitch and Velocity can be inverted. The following Program illustrates this:
 Download the Inverter Keyboard patch here.
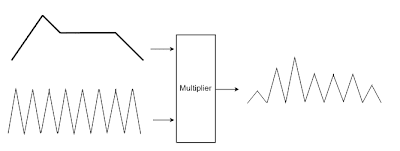
The Multiplier Components
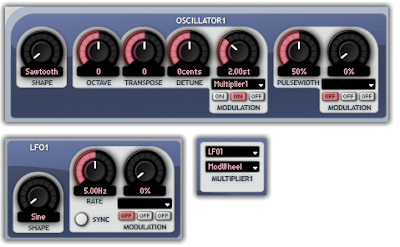
Aspect has 2 individual Multipliers units, Multiplier1 and Multiplier2. Both of these take two Modulation Sources and produce an output that is equal to the product (multiplication) of the inputs. This is particularly useful for producing scaled Modulation Sources. For example, assigning both LFO1 and the Mod Wheel Modulation Source to a Multiplier produces an LFO output with a Depth can be controlled with the Mod Wheel:
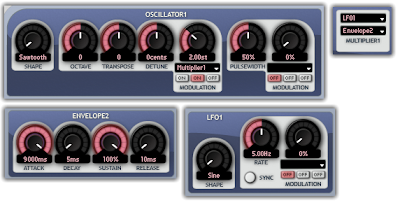
 LFOs that gradually fade up to their maximum Depth is another often used synthesis technique. Multiplying an LFO by an Envelope will accomplish this. In this case, the Envelope shape should have maximum Sustain. The Envelope's Attack parameter will govern how long it takes to fade in:
Part 2 of this tutorial will cover the remaining Patch Components, which are the Lag Generator, the Sample & Hold unit, and the Adders.
Aspect's flexible patching and modulation system can be a source of confusion to users more used to synthesizers with a fixed architecture. In synthesis, to modulate a parameter means to change the parameter's value whilst the sound is playing. This adds interest to what would otherwise be dull, static sounds. Most synth users are familiar with the basic modulation sources - envelopes and LFOs (low frequency oscillators). One common arrangement is the modulation of an oscillator's pitch by an LFO, producing vibrato. Another is the modulation of a filter's cutoff frequency by an envelope, resulting in a sound that has varying degrees of brightness as the higher frequencies are dynamically removed.
The Aspect Semi-Modular Synthesizer
Aspect is a synthesizer in the tradition of semi-modular synthesizers like the Korg MS-10 and Korg MS-20. The appeal of these instruments is not only in their fantastic analogue sound, but in their versatility. Re-routing means that any nearly any component can be used as a modulation source. The Patch panel expands this concept by allowing modulation sources to be combined and transformed in various ways. Download Aspect for Windows, Mac OS X, and Linux, in Audio Unit, VST, and RTAS Plugin formats.
Modulating Parameters
Rather than a confusing web of patch cables strung between modulation sources and parameters, Aspect uses a wireless modulation system. Modulation sources for a Parameter are clearly displayed with both their name and Modulation Depth (the amount that a Modulation Source alters a Parameter). The Depth for a particular parameter is listed in relevant units. For example, Modulation Depth for an Oscillator is specified in semitones. In the following screenshot, we can see that Oscillator1 is modulated 12 semitones by LFO2:
 The basic steps for routing Modulation Sources in Aspect are as follows:
To assign a Modulation Source to a Parameter:
- Left-click the Parameter's Modulation combo box.
- Select the required Modulation Source from the drop-down list.
- Left-click on the Parameter's Modulation combo box.
- Select 'Off' from the drop-down list.
- Left-click and drag the Parameter's Modulation Depth rotary control upwards to increase the Modulation Depth, or downwards to decrease it. Holding Shift whilst dragging allows fine resolution changes to be made.
Aspect has 2 Inverter components, Inverter1 and Inverter2, both of which perform the same function. They take a Modulation Source and output a signal that equal to the input source flipped upside down. The following diagram illustrates this concept:

One typical use of an inverted Envelope shape is in the creation of pad sounds. Here we have a pad sound through a Lowpass Filter, with the Filter's Cutoff modulated by an inverted Envelope shape. This creates a sound with an unconventional flourish at the end: where a pad normally grows duller during the Release stage as the Filter is closed, here it gets brighter during Release as the Filter opens.
Download the Inverter Filter Pad Sound patch here.
 Here is another example of an inverted Modulation Source. This tutorial on sequencing with a modular synthesizer uses an inverted Sawtooth LFO routed to the Output Amplifier to produce a quick Attack and slow Decay repeating envelope shape.
Because all signals within Aspect can be used for Modulation purposes, even MIDI control data such as Note Pitch and Velocity can be inverted. The following Program illustrates this:
- Start with an empty Program by clicking File / New Program.
- Assign Note Pitch to Inverter1.
- Replace Oscillator1's Note Pitch Modulation Source with Inverter1.
 Download the Inverter Keyboard patch here.
 The Multiplier Components
Aspect has 2 individual Multipliers units, Multiplier1 and Multiplier2. Both of these take two Modulation Sources and produce an output that is equal to the product (multiplication) of the inputs. This is particularly useful for producing scaled Modulation Sources. For example, assigning both LFO1 and the Mod Wheel Modulation Source to a Multiplier produces an LFO output with a Depth can be controlled with the Mod Wheel:
- Set LFO1 to a rate of 5Hz.
- Set the first input of Multiplier1 to LFO1, and set the second to Mod Wheel.
- Set Oscillator1's second Pitch Modulation Slot to Multiplier1, with a Depth of 2 semitones (Modulation Slot 1 is left assigned to Note Pitch so that the Oscillator will still track the keyboard.)
 LFOs that gradually fade up to their maximum Depth is another often used synthesis technique. Multiplying an LFO by an Envelope will accomplish this. In this case, the Envelope shape should have maximum Sustain. The Envelope's Attack parameter will govern how long it takes to fade in:

Part 2 of this tutorial will cover the remaining Patch Components, which are the Lag Generator, the Sample & Hold unit, and the Adders.
Monday, 1 June 2009
Recreating Boards of Canada's Roygbiv Bassline
Boards of Canada's Music Has the Right to Children is an album full of intriguing synthesizer lines and processed sampled sounds. Perhaps the most recognizable is from Roygbiv; a phat, laid-back slice of analogue nostalgia. Roygbiv, the name taken from a mnemonic for remembering the orders of colours in the visible spectrum, opens with a deceptively simple bass sound. It is this bass that we will recreate.
Whilst the Scottish two-piece are notoriously cagey about techniques and equipment, they are known to make good use of analogue synths. The bass in question is likely a Roland SH-101. Aspect excels at recreating these analogue style sounds. The Aspect evaluation can be downloaded here in VST Plugin, Audio Unit, RTAS, and Standalone formats for Mac OS X, Windows, and Linux.
Start, as all good sound designers generally do, with the initial patch by choosing New Program under the File menu.
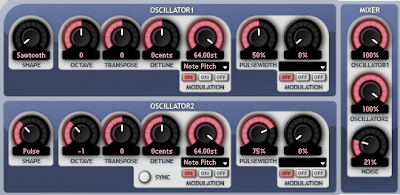
The bass is obviously monophonic, so leave the Polyphony set to 1. The general rule for subtractive synth sound creation is, start with the oscillators. Oscillator1, set to 100% in the Mixer, should be dialed to Sawtooth. Oscillator2, also 100% in the Mixer, should be set to the Pulse shape with a Pulsewidth of about 75%, and detuned down an octave (turn Oscillator2's Octave rotary to -1). Finally, a little noise helps add some grit to the sound: set the Noise level in the Mixer to about 21%.
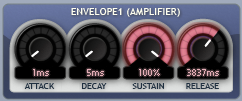
The bass sound has a fairly simple amplitude envelope shape. Set Envelope1's Attack and Decay to their lowest setting (1ms and 5ms, respectively). Set Sustain to 100%, and Release to about 4000ms. This gives a punchy bass sound with a fairly long tail.
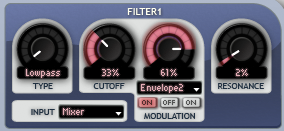
Even small changes to the filter produce huge changes in this sound. As is normally the case with bass sounds, we'll use a Lowpass filter. Set the Filter1's Cutoff to 33%, and set the keyboard tracking modulation (called Note Pitch in the modulation menu) to about 75%.
Sounds nice, but lacks Roygbiv's growl. We can fix that. Assign Envelope2 to Filter1's modulation with a depth of 61%. The appropriate envelope shape should have a quick Attack and a slow Decay/Release. Let's use Attack 25ms, Decay 2500ms, Sustain of 45%, and Release of 3000ms. A filter Resonance of about 2% adds the necessary bite to the sound.
A few last tweaks introduce some analogue authenticity. A slow wavering of the pitch adds some subtle warmth to the sound. Set LFO1 to a rate of about .30Hz, and route it into Oscillator1's second Pitch Modulation Slot with a depth of a few cents (0.02 semitones sounds good). Likewise, set LFO2 to a rate of about .10Hz, and route it into Oscillator2's second Pitch Modulation Slot, this time with a depth of about 0.09st.
Aspect's second filter can be used to grunge up the sound a tad. Route Filter1 into the Input of Filter2, and set Filter2 to Highpass with a Cutoff of 0%. The Output Filter Mix should be about 15% to add a small amount of the high-passed signal into the chain.
Finally, turn on Always Glide in the Global section, and set Glissando to 12%. This provides the sliding movement between two consecutive notes played at different pitches.
So here is the Roygbiv subtractive synth patch for Aspect, and this is what the recreation sounds like.
The fairly heavy reverb present in the original song is here provided by Apple Logic's AVerb plug-in. Adding a warm tape-style compression and some subtle eq would likely produce a more authentic sound. This is left as an exercise for the reader.
Whilst the Scottish two-piece are notoriously cagey about techniques and equipment, they are known to make good use of analogue synths. The bass in question is likely a Roland SH-101. Aspect excels at recreating these analogue style sounds. The Aspect evaluation can be downloaded here in VST Plugin, Audio Unit, RTAS, and Standalone formats for Mac OS X, Windows, and Linux.
Start, as all good sound designers generally do, with the initial patch by choosing New Program under the File menu.
The bass is obviously monophonic, so leave the Polyphony set to 1. The general rule for subtractive synth sound creation is, start with the oscillators. Oscillator1, set to 100% in the Mixer, should be dialed to Sawtooth. Oscillator2, also 100% in the Mixer, should be set to the Pulse shape with a Pulsewidth of about 75%, and detuned down an octave (turn Oscillator2's Octave rotary to -1). Finally, a little noise helps add some grit to the sound: set the Noise level in the Mixer to about 21%.

The bass sound has a fairly simple amplitude envelope shape. Set Envelope1's Attack and Decay to their lowest setting (1ms and 5ms, respectively). Set Sustain to 100%, and Release to about 4000ms. This gives a punchy bass sound with a fairly long tail.

Even small changes to the filter produce huge changes in this sound. As is normally the case with bass sounds, we'll use a Lowpass filter. Set the Filter1's Cutoff to 33%, and set the keyboard tracking modulation (called Note Pitch in the modulation menu) to about 75%.
Sounds nice, but lacks Roygbiv's growl. We can fix that. Assign Envelope2 to Filter1's modulation with a depth of 61%. The appropriate envelope shape should have a quick Attack and a slow Decay/Release. Let's use Attack 25ms, Decay 2500ms, Sustain of 45%, and Release of 3000ms. A filter Resonance of about 2% adds the necessary bite to the sound.

A few last tweaks introduce some analogue authenticity. A slow wavering of the pitch adds some subtle warmth to the sound. Set LFO1 to a rate of about .30Hz, and route it into Oscillator1's second Pitch Modulation Slot with a depth of a few cents (0.02 semitones sounds good). Likewise, set LFO2 to a rate of about .10Hz, and route it into Oscillator2's second Pitch Modulation Slot, this time with a depth of about 0.09st.
Aspect's second filter can be used to grunge up the sound a tad. Route Filter1 into the Input of Filter2, and set Filter2 to Highpass with a Cutoff of 0%. The Output Filter Mix should be about 15% to add a small amount of the high-passed signal into the chain.
Finally, turn on Always Glide in the Global section, and set Glissando to 12%. This provides the sliding movement between two consecutive notes played at different pitches.
So here is the Roygbiv subtractive synth patch for Aspect, and this is what the recreation sounds like.
The fairly heavy reverb present in the original song is here provided by Apple Logic's AVerb plug-in. Adding a warm tape-style compression and some subtle eq would likely produce a more authentic sound. This is left as an exercise for the reader.
Thursday, 28 May 2009
Aspect, Manifold, and Resound 1.3.2 released, now available in RTAS plugin format.
Aspect 1.3.2, Manifold 1.3.2, and Resound 1.3.2 have now been officially released. Download them in VST Plugin, Audio Unit, RTAS, or Standalone format for Windows, Mac OS X, and Linux.
The main focus of these releases was the anticipated RTAS Plugin versions for users of Pro Tools LE, Pro Tools M-Powered, and Pro Tools|HD. Besides this, they also add new features and fixes, a few of which will be discussed in some detail below.
A|B comparison function
The A|B comparison function lets you quickly compare the sound of an edited program to the original settings. This is ideal for auditioning changes to a patch in order to decide if they improve the sound. Each press toggles the sound between the edited and original settings.
Reduced CPU usage
Aspect's Pulse waveform now uses about half the CPU resources when compared to the previous version. The panning algorithm - as used in both Aspect's Output section, and the Stereo Spread block of Manifold - also uses much less CPU. Another optimization reduces CPU time when the synthesis engine isn't using feedback (e.g., connecting Oscillator 1's output back into itself as a Pitch Modulation source.) Obviously, depending on the operating system, sound card and host buffer size your mileage may vary, but Aspect's Celestial String patch now uses about 30% less CPU compared to version 1.2. *
Minor glitch
When adding a plugin to a playing track in Garage Band (and likely some other hosts as well) a minor audio glitch could be heard. This has now been fixed, making the plugins ideal for those who like to add effects on the fly whilst playing live.
* Metric measured on an AMD 1.7Ghz Windows XP laptop, using Energy XT 1.4 as a VST host, and with the ASIO4ALL driver and the laptop's terrible built-in soundcard.
Saturday, 16 May 2009
Loomer RTAS plugins for Pro Tools open beta
The RTAS versions of Aspect, Manifold, and Resound are now available as an open beta for anyone to try. The 1.3 beta versions contain RTAS format plugins for Mac OS X and Windows systems running Pro Tools 7 or above. The usual caveats of beta software apply: whilst we endeavor to release as stable a product as possible, beta software should not be considered for use in unrehearsed live work. Note that the beta can be downgraded to the last stable release by running a previous installer.
And 1.3 isn't just for Pro Tools users - they also offer improvements for users of the Standalone, Audio Unit, or VST plugin versions. These include reduced CPU usage, compatibility fixes for several host specific problems, and a new A/B comparison feature.
[EDIT: Beta links removed - the official 1.3.2 releases are now available here.]
Let us know if you find any problems with the beta, or have any suggestions for new features. Post a reply here, or on our official support forum, or contact us directly via the Loomer support page.
Monday, 4 May 2009
Modular synth sequencing, without a sequencer
This article presents a technique for producing step sequencer style patterns in a modular synth, without using a sequencer. We'll again be using the Aspect semi-modular synth. Download Aspect for Windows, Mac OS X, or Linux in Audio Unit, VST Plugin and Standalone application formats here. (Note: Only registered Aspect owners will be able to open the patches that accompany this tutorial.)
Start with a blank program configuration by clicking File / New Program.
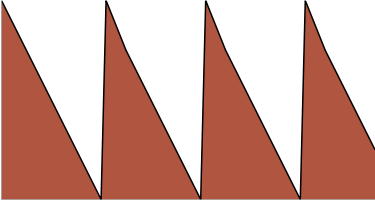
A sequencer connected to a synth will trigger a succession of notes, where the volume contour of each note is controlled by the synth's amplifier envelope. This triggered envelope can be emulated by instead using a repeating modulation source to shape the note volume. We'll use a percussive volume contour: a quick attack, and slow decay. A Sawtooth LFO (Low Frequency Oscillator, in this case LFO1) will provide the shape we need, but from the following display we can see a problem: Aspect's Sawtooth LFOs ramp upwards, which is equivalent to a slow attack, and instant decay.
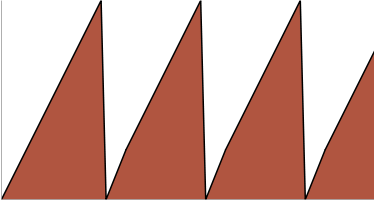
This is easily corrected by linking the LFO's output into an Inverter component (we'll use Inverter1 in this example). As you'd expected, this generates the shape we need (see diagram below.)
Which, when connected to the Output Amp Modulation and Synced to a rate of 1/16, produces the following 16th note pattern:
Download the gated patch for Aspect by clicking here.
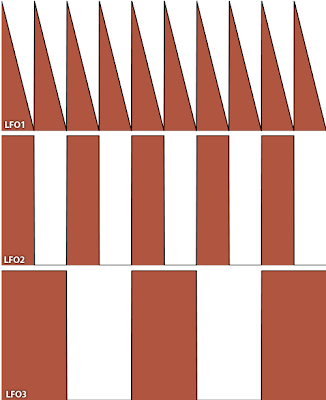
The remaining 2 LFO components will be used to make the notes within our sequence play at different pitches. Both LFO2 and LFO3 are set to Synced Square waves. LFO2 is set to a rate of 1/8, and LFO3 to a rate of 1/4. when we align all three LFO signals we can clearly see a short sequence that repeats every four 16th notes:
The LFOs now need to be connected up as modulation sources to their required destinations. LFO2 should go to Oscillator1's second Pitch Modulation slot, with a depth of 2.00 semitones. (Remember that holding down the Shift key whilst dragging a rotary control will allow for more precise changes. This is useful when exact modulation depths are required.) LFO3 should be connected to Oscillator1's third Pitch Modulation slot, this time with a depth of 7.00 semitones.
With LFO2's Square modulation output causing Oscillator1's Pitch to move between 2 semitones up and 2 semitones down every 16th note, and LFO3 causing a modulation of 7 semitones, up and down, each 8th note, we get the following jaunty pattern repeated every four 16th notes:
+9 semitones
+5 semitones
-5 semitones
-9 semitones
When this is played through Aspect's lowpass filter, set to a moderate resonance, sounds something like:
Download the sequencer patch for Aspect by clicking here.
Due to Aspect's flexible semi-modular architecture, even without a dedicated sequencer interesting melodic patterns can be created. We've explored the simplest example - using LFOs to control a note's pitch - but for the more dedicated sound designer, Aspect's audio rate modulation sources and Patch section components provide the building blocks for a wealth of complex sequencer-style patterns.
Start with a blank program configuration by clicking File / New Program.
A sequencer connected to a synth will trigger a succession of notes, where the volume contour of each note is controlled by the synth's amplifier envelope. This triggered envelope can be emulated by instead using a repeating modulation source to shape the note volume. We'll use a percussive volume contour: a quick attack, and slow decay. A Sawtooth LFO (Low Frequency Oscillator, in this case LFO1) will provide the shape we need, but from the following display we can see a problem: Aspect's Sawtooth LFOs ramp upwards, which is equivalent to a slow attack, and instant decay.

This is easily corrected by linking the LFO's output into an Inverter component (we'll use Inverter1 in this example). As you'd expected, this generates the shape we need (see diagram below.)

Which, when connected to the Output Amp Modulation and Synced to a rate of 1/16, produces the following 16th note pattern:
Download the gated patch for Aspect by clicking here.
The remaining 2 LFO components will be used to make the notes within our sequence play at different pitches. Both LFO2 and LFO3 are set to Synced Square waves. LFO2 is set to a rate of 1/8, and LFO3 to a rate of 1/4. when we align all three LFO signals we can clearly see a short sequence that repeats every four 16th notes:

The LFOs now need to be connected up as modulation sources to their required destinations. LFO2 should go to Oscillator1's second Pitch Modulation slot, with a depth of 2.00 semitones. (Remember that holding down the Shift key whilst dragging a rotary control will allow for more precise changes. This is useful when exact modulation depths are required.) LFO3 should be connected to Oscillator1's third Pitch Modulation slot, this time with a depth of 7.00 semitones.
With LFO2's Square modulation output causing Oscillator1's Pitch to move between 2 semitones up and 2 semitones down every 16th note, and LFO3 causing a modulation of 7 semitones, up and down, each 8th note, we get the following jaunty pattern repeated every four 16th notes:
+9 semitones
+5 semitones
-5 semitones
-9 semitones
When this is played through Aspect's lowpass filter, set to a moderate resonance, sounds something like:
Download the sequencer patch for Aspect by clicking here.
Due to Aspect's flexible semi-modular architecture, even without a dedicated sequencer interesting melodic patterns can be created. We've explored the simplest example - using LFOs to control a note's pitch - but for the more dedicated sound designer, Aspect's audio rate modulation sources and Patch section components provide the building blocks for a wealth of complex sequencer-style patterns.
Monday, 27 April 2009
Pro Tools beta testers wanted to test RTAS plug-ins
In addition to VST Plugin and Audio Unit formats, our products, Aspect, Manifold, and Resound, now come in RTAS formats for users of Pro Tools 7 and above, on Mac OS X (Intel and PPC) and Windows. We are looking for Pro Tools users to volunteer in helping test the new plug-in formats prior to release.
Obviously, applicants would need experience with a Pro Tools setup of some description, but other than that there are no particular requirements. Experience with our products, or indeed being a license owner, is nice, but by no means essential.
If you're interested in getting your mitts on a beta version, either post here, or contact me via the email address listed on our support page. You should provide the following information:
Thanks!
Obviously, applicants would need experience with a Pro Tools setup of some description, but other than that there are no particular requirements. Experience with our products, or indeed being a license owner, is nice, but by no means essential.
If you're interested in getting your mitts on a beta version, either post here, or contact me via the email address listed on our support page. You should provide the following information:
- Machine processor type (Intel, or PPC)
- Operating System
- Pro Tools version
- Which products you would be able to test
- (If applicable) Any experience with Loomer products
Thanks!
Saturday, 21 February 2009
Kick Drum Synthesis
This tutorial presents an approach for synthesizing kick drum sounds using Aspect. Aspect is available for Mac OS X, Windows, and Linux in Audio Unit, VST Plugin, and Standalone formats. Download the Aspect evaluation here. The evaluation version is all that is required for following the tutorial. However, only registered users will be able to open the example patch accompanying this article.
Rather than a general kick drum synthesis guide, this will focus on recreating a specific kick sample. The analysis techniques outlined below can be applied to a wide range of sounds, and provide a solid starting point when attempting to recreate any sound. Here is the kick drum sample, a heavily processed 808, that we will attempt to recreate:
Download the 808 sample here.
Analyzing the source sample will reveal important cues that can help when recreating it as a synth patch. For this, we will use Audacity, a free, open-source, wave editor available for Windows, Mac OS X, and Linux. Audacity can be downloaded from here.
Load the original sample into Audacity. The default view in Audacity is the waveform, a graph of time (running along the x-axis) against amplitude (running up the y-axis).
Several key points can be noted here:
Click on the "808kick1" combo box at the top left of the Audacity track, and choose Spectrum from the display modes. Because the kick sample is made of low frequency content, changing the Spectrogram options (under Preferences) to 4096 sample FFT Size and Maximum Frequency of 2000Hz limits the display to the most useful content.
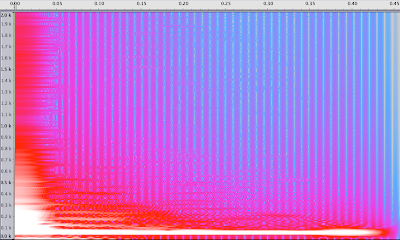
From this view, we can establish the following:
This gives us enough information to begin synthesis. Open Aspect, and create an empty program by choosing File / New Program.
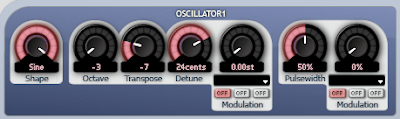
We know the general waveform shape, so change Oscillator 1's Shape to Sine. We don't need the Oscillator to track the keyboard, so remove Note Pitch from Oscillator 1's first modulation slot (by clicking on it and selecting "None" from the menu.) Finally, tune the Oscillator to a suitable frequency: an Octave of -3, Transpose of -7 and Detune of 24cents sounds about right. Playing a note gives a suitably sub-kick like sound.
Next, we'll shape the amplitude of the kick using Envelope 1. From our analysis, we know that that sample lasts around 430ms. Tweak Envelope 1 to have an approximate Attack of 1ms, Decay of 430ms, Sustain of 0%, and Release of 430ms. Surprisingly, this sounds much shorter that the source sample. Why? This is due to Aspect having particularly punchy envelopes. Decay and Release stages fall much more rapidly in Aspect than in an 808. Increasing the Envelope Decay and Release times to 880ms gives us the expected sound.
The initial noise burst is modeled using Envelope 2 (keeping with its default values of an Attack of 1ms, Decay of 5ms, 0% Sustain and 10ms Release) assigned to Oscillator 1's first modulation slot. A Depth of 39.33 semi-tones lends an appropriate crack to the drum sound. The falling tone is generated using Envelope 3, with an Attack of 1ms, Decay of 55ms, Sustain of 0% and Release of 60ms. This is assigned to Oscillator 1's second modulation slot, and given a Depth of 31.55 semitones.
A little grit is added to the drum by introducing a small amount of Noise (about 13%) into the Mixer. In order to add a small pitch variation, the Noise is also used as a the source for Oscillator 1's third modulation source. A Depth of 16.00 semitones sounds about right. Finally, any unwanted high frequencies components are removed by lowering Filter 1's Cutoff frequency to about 62%.
Altogether, this sounds like:
Download the Aspect 808 patch here.
Whilst it is not exactly identical to our source, it's certainly very close. And in the context of a mix, it'll be even more difficult to tell the synthesized kick from the source sample.
Rather than a general kick drum synthesis guide, this will focus on recreating a specific kick sample. The analysis techniques outlined below can be applied to a wide range of sounds, and provide a solid starting point when attempting to recreate any sound. Here is the kick drum sample, a heavily processed 808, that we will attempt to recreate:
Download the 808 sample here.
Analyzing the source sample will reveal important cues that can help when recreating it as a synth patch. For this, we will use Audacity, a free, open-source, wave editor available for Windows, Mac OS X, and Linux. Audacity can be downloaded from here.
Load the original sample into Audacity. The default view in Audacity is the waveform, a graph of time (running along the x-axis) against amplitude (running up the y-axis).

Several key points can be noted here:
- The kick sample lasts approximately 0.43 seconds.
- The kick amplitude envelope is more or less stationary until 0.12 seconds, at which point is decays towards 0.
- The general wave shape is a sine. Zooming in closely to the waveform reveals that it isn't a perfect sine: there appears to be small amount of noise and grit in the signal.

- The sine is gradually falling in frequency. This can be deduced from the increasing wavelength of the oscillator periods. A clearer view of the frequency content of the sample can be displayed by switching Audacity to its Spectrum display mode.
Click on the "808kick1" combo box at the top left of the Audacity track, and choose Spectrum from the display modes. Because the kick sample is made of low frequency content, changing the Spectrogram options (under Preferences) to 4096 sample FFT Size and Maximum Frequency of 2000Hz limits the display to the most useful content.

From this view, we can establish the following:
- An initial burst of noise between 0.00 and 0.05 seconds.
- A falling tone between 0.05 and 0.20.
- A steady state frequency of about 50Hz.
This gives us enough information to begin synthesis. Open Aspect, and create an empty program by choosing File / New Program.
We know the general waveform shape, so change Oscillator 1's Shape to Sine. We don't need the Oscillator to track the keyboard, so remove Note Pitch from Oscillator 1's first modulation slot (by clicking on it and selecting "None" from the menu.) Finally, tune the Oscillator to a suitable frequency: an Octave of -3, Transpose of -7 and Detune of 24cents sounds about right. Playing a note gives a suitably sub-kick like sound.

Next, we'll shape the amplitude of the kick using Envelope 1. From our analysis, we know that that sample lasts around 430ms. Tweak Envelope 1 to have an approximate Attack of 1ms, Decay of 430ms, Sustain of 0%, and Release of 430ms. Surprisingly, this sounds much shorter that the source sample. Why? This is due to Aspect having particularly punchy envelopes. Decay and Release stages fall much more rapidly in Aspect than in an 808. Increasing the Envelope Decay and Release times to 880ms gives us the expected sound.
The initial noise burst is modeled using Envelope 2 (keeping with its default values of an Attack of 1ms, Decay of 5ms, 0% Sustain and 10ms Release) assigned to Oscillator 1's first modulation slot. A Depth of 39.33 semi-tones lends an appropriate crack to the drum sound. The falling tone is generated using Envelope 3, with an Attack of 1ms, Decay of 55ms, Sustain of 0% and Release of 60ms. This is assigned to Oscillator 1's second modulation slot, and given a Depth of 31.55 semitones.
A little grit is added to the drum by introducing a small amount of Noise (about 13%) into the Mixer. In order to add a small pitch variation, the Noise is also used as a the source for Oscillator 1's third modulation source. A Depth of 16.00 semitones sounds about right. Finally, any unwanted high frequencies components are removed by lowering Filter 1's Cutoff frequency to about 62%.
Altogether, this sounds like:
Download the Aspect 808 patch here.
Whilst it is not exactly identical to our source, it's certainly very close. And in the context of a mix, it'll be even more difficult to tell the synthesized kick from the source sample.
Sunday, 8 February 2009
Probabilistic Step Sequencing meets Cellular Automaton with Elysium
Aleatoricism is defined as "art created by exploiting randomness". From Pierre Boulez's experimentation with controlled chance to Brian Eno's use of Koan to produce Generative Music 1, it's a well explored area of music composition. Even Roland's TB-303 offered prospects for the aleatoric explorer: leaving the battery removed for a short time corrupted the sequencer memory, generating 64 tracks of random acid.
Elysium is a probabilistic sequencer, developed by LucidMac Software and available (for free) on Mac OS X. It's a pure sequencer, not a synthesizer or a host. It doesn't produce any sound itself, but generates a MIDI stream that can be used to drive any MIDI consuming application or hardware. Despite this, syncing with a DAW such as Logic or Live running on the same machine as Elysium is completely pain-free; no additional configuration was required to get it working.
The Elysium interface is made up of a grid of hex cells, each representing a note of a certain pitch. Playheads move across the grid in sync with the tempo. By placing tokens on cells, the playheads (which are spewed out at specified tempo from a Generate token) can be made to perform an action: a Note token causes the note on the underlying grid to be played; a Split token divides a single playhead into several, each launching out at different trajectories; a Rebound token bounces the playhead back in the opposite direction.

Tokens can also be assigned probabilities, only performing their functions on a roll of the virtual dice: 50% of the time, this playhead will rebound; 25% of the time, this note will play. Using this system, constantly varying pieces of music that would be tricky to compose using traditional sequencers can easily be easily generated.
Watching playheads creep across a grid is somewhat reminiscent of John Conway's cellular automaton Life simulation. The interface is simple to use, but not necessarily intuitive at first glance. Reading the introductory documentation, which is scant but does well in explaining the basics, is advised.
Elysium is currently only available for Mac OS X. It was recently released as open-source under the MIT license, so there is a chance of seeing a port to other operating systems. More information about Elysium can be found at http://lucidmac.com/products/elysium
Subscribe to:
Posts (Atom)